Thursday 29 December 2011

ROM - 01


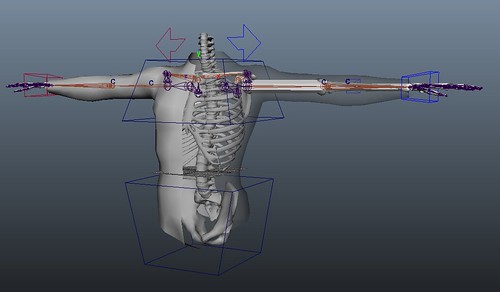
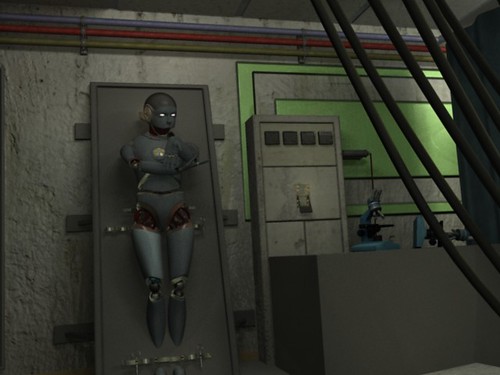
ROM - 01, originally uploaded by James D Thompson.

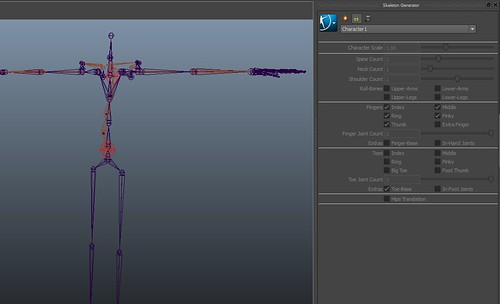
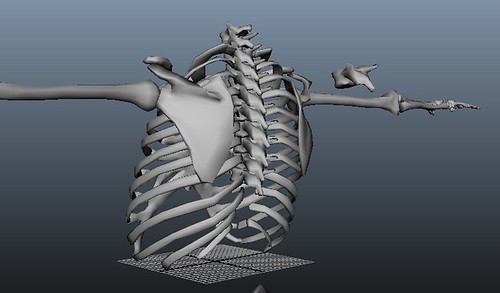
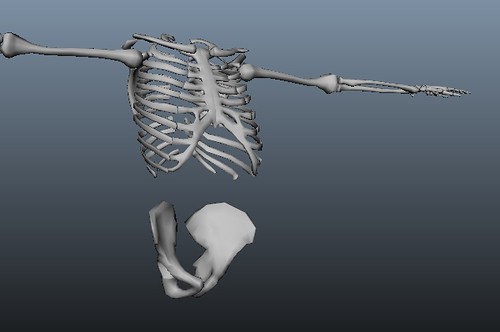
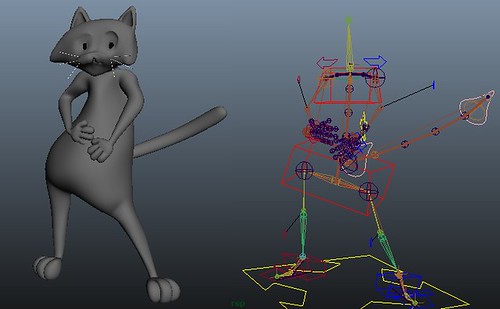
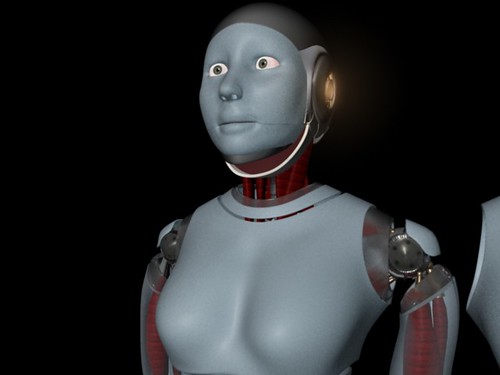
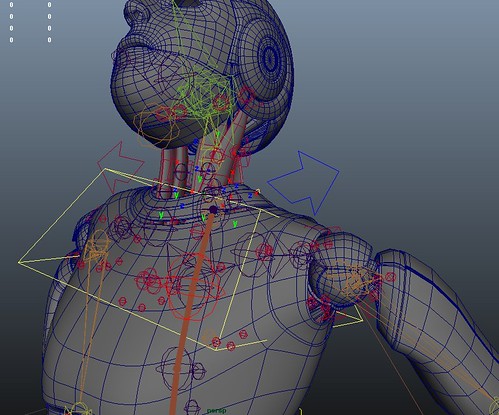
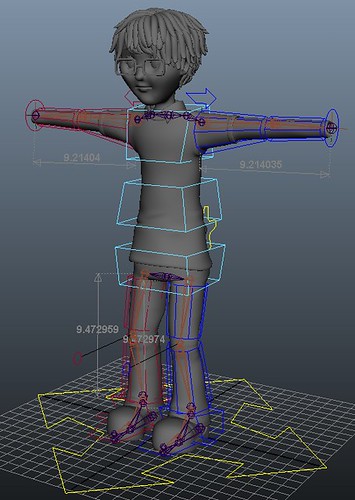
This is the rom (range of motion).

This was captured for one of the motion capture actors we used for the motion capture module. I decided to use this as i dont want to spend too much time cleaning up the data (as that's not the focus of this project) and it has the best range of motion.

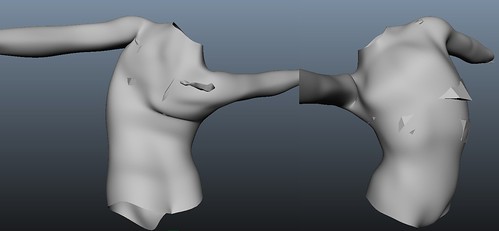
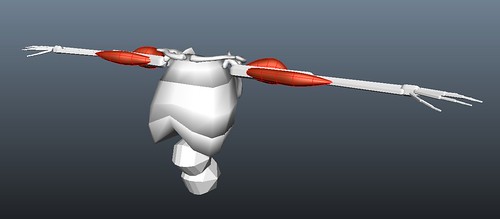
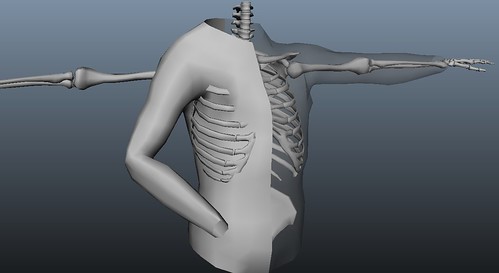
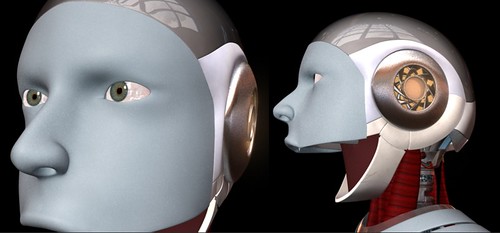
This is just a work in progress as some muscles still need adding and refining but at this stage i just want some motion to test the skinning as im doing it.

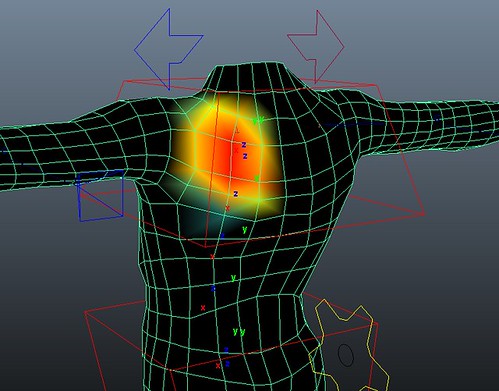
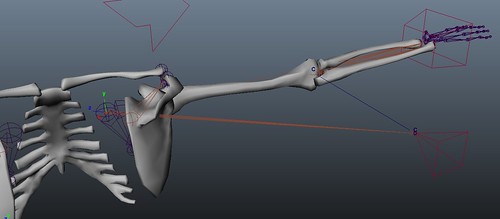
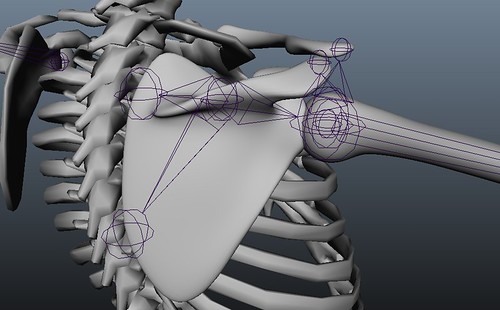
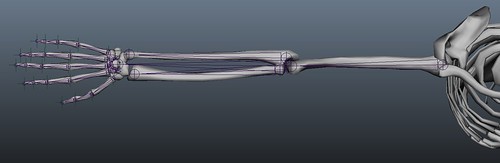
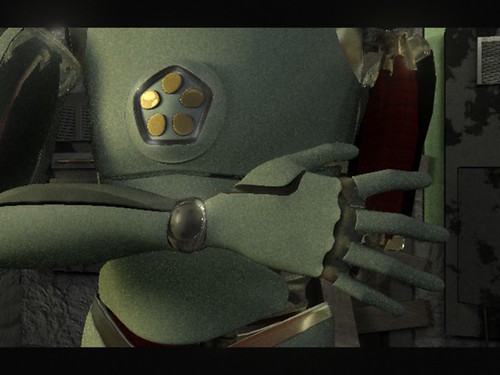
Main areas the look odd are the forearms and neck when the arms are lower down. Interestingly these are the only areas i haven't added muscle yet so it just goes to show that they are adding some realism. Other areas that need improving are the scapula's (as there are quite a few muscles to get the skinning correct) and the left wrist as when mirroring the weights over it doesn't mirror them exactly so some adjustments need to be made.

Motion capture is designed to accurately record the bone movements of an actor and capture subtle movements that make a character look more life like so using muscles where adding the subtle muscle movements that make the skin feel more life like.

Masters - WIP - 28


Masters - WIP - 28, originally uploaded by James D Thompson.

Making a skeleton using the human ik that will eventually drive my own skeleton that you can see on top.

As this muscle rig is attempting to show more realism for this ill be driving the character with motion capture data and what better motion than the full range of motion you take at the start of a shoot. This way i can take some realistic range of motion and see how the muscles react.

Im making a skeleton with the human IK tools in maya 2012, then taking it into motion builder and bringing back the motion capture ill be constraining the arm IK and chest controls to the mo-cap skeleton, then ill use bake simulation to get it baked to key frames so i can delete the mo-cap rig and edit the keys on my own rig.

This is just a quick and easy way of creating an in-between rig just so i can apply the motion to my own rig and delete the in-between rig after.

Warning: if your ever thinking of using this human IK for animation i wouldn't as its mainly for taking into motion builder for motion capture data. It doesn't like to be edited that much and when you apply a control rig to it its not very animation friendly in my opinion.

Wednesday 28 December 2011

Masters - WIP - 27


Masters - WIP - 27, originally uploaded by James D Thompson.

Started painting the weights for the muscles. Needs some more work around the shoulders but you can instantly see how well the muscles and bones can help define and keep the volume.

This is probably an extreme pose stretching the spine backwards but you can see how the scapula muscles and bone are causing some nice defined but smooth creases.

Using custom bone objects for the rib cage has helped the chest from collapsing and including the muscles between the ribs and arm (clavicular and abdominal portions) helps sculpt the skin .

This method of rigging takes a bit more research and know how but if defiantly pays off for the results you get.

Note: the mesh you can see cutting through the skin will be hidden when rendered so the clipping isn't an issue.

Upper body - Jiggle test


Upper body - Jiggle test, originally uploaded by James D Thompson.

Just added some animation to the upper body chest control to see how the muscles jiggle.

Here ive added some custom jiggle weights so they all don't act the same and they act how the should compared to there real life counterpart.

For the belly ive also added a muscle which acts as the overall volume of fat for the chest that will jiggle as you move so this is an area where you can use muscles for non musculature deformations. for this i attached the muscle from the bottom of the spine to the top between the arms and giving this a higher jiggle weight means it jiggles and acts like a large lump of fat. Then when painting weights ill only add some slight influence of this muscle so there will just be some subtle fat jiggling. If this was an obese character i could give this more jiggle and paint more weight to this muscle so the skin jiggles like there's more fat.

Other ways of adding extra movement and fat is by using the sliding weights and jiggle weights when painting weights. With the muscle system there are several different typed of weights to paint (as apposed to 1 when using the normal skin cluster). The main one is the sticky weight which is where the skin will stick to the bone/muscle object (similar to normal paint weights) then there's things like sliding and jiggle weights which allow the skin to slide (if you bend your elbow the skin will stretch and slide across the bone) and jiggle weights alow the skin to droop and jiggle when moved which gives the illusion of more fat.

Masters - WIP - 26


Masters - WIP - 26, originally uploaded by James D Thompson.

Adding upper body muscles, top image is the chest, bottom being the back.

For the back ive added in the main muscles that connect between the scapula and the humerus as these will give the most deformation as the arms and shoulder moves. For the chest ive added in a few muscles but left out some of the main chest muscles as they do provide a biological function of moving the chest but they don't actual deform much so as an end result the don't deform the skin that much so there not that important to involve. Involving them would just slow the overall rig and cause more painting weights for no added effect.

The back muscles attached between the scapula and spine (rhomboid major and minor) don't have much deformation but will help the mesh of the back from collapsing when the spine has some extreme stretching or twisting on it.

Friday 23 December 2011

Masters - WIP - 25


Masters - WIP - 25, originally uploaded by James D Thompson.

Adding the muscles and more bones objects for the thoracic cavity.

The thoracic cavity is the volume under the ribs so as you bend stretch and twist your spine you ribs also move and change the overall thoracic cavity volume, this also happens when you breath. By adding these to the rig when the spine bends the skin better morphs how it should as the ribs move.

I found that by adding this thoracic cavity as one mesh it looks good until the spine bent because it was one object it looked too stiff. To fix this i split the volume up into 4 parts so when they were connected to the spine the each have there own movement. So when the back arches backwards the area expands and when the spine lean forwards into itself the cavity compresses.

So far for the muscles ive added the biceps and triceps. The main thing about muscle rigging is that its best to follow the biology of what you're creating but it doesn't and shouldn't need to be perfect. For example on my rig the end of the triceps is sticking out the elbow because a real triceps would collide with your elbow and wrap around but this isn't possible with current rigging techniques and isn't needed as it would over complicate things. By having the end stick out that means when the arm bends the triceps end moves more, thus giving more of a stretch for maya to work with which in the end give a more realistic result than if i had placed it in the exact biological position.

The volume doesn't need to be perfect either, for my muscles (and others ive seen on industry rigs) have the muscles clipping outside the skin, this is because (like normal maya joints) there not a biological representation of a muscle, there a deformer that gives the illusion of a muscle, so at render time they will be hidden so as long as the skin looks like it has the correct deformation it relay doesn't matter what the muscle looks like. Having said that thought its still a good idea not to deviate from the actual biology of what you're creating.

Also for this i have set up the proper jiggle weight so when its animated the muscles jiggle as the should. Ive also create custom muscle shapes so the muscles deformed like real muscles, so the triceps becomes more triangular shaped when squashed.

Masters - WIP - 24


Masters - WIP - 24, originally uploaded by James D Thompson.

Here ive converted the skin to a maya muscle skin.

In the shot above ive taken the polygon scapula i made earlier and converted it to a muscle object and added it to the skin, this way the actual polygon mesh acts as a bone that can push the skin, this is important for bones like the scapula and clavicle as when you move you can see them pushing and defining the skin.

For example if i wanted a skinny character i might consider adding the ribs as muscle objects as they could be used to define the bones pushing through the skin.

Masters - WIP - 23


Masters - WIP - 23, originally uploaded by James D Thompson.

Just skinning the mesh to the joints using normal smooth skin. with the default skinning you can instantly see problems where the skin collapses. To solve this you would need to paint the weights but for this ill be converting it to a muscle skin and blocking out a simple rib cage collision object to stop this from collapsing in.

The reason i made a smooth bind is because when i convert to muscle skin it will automatically take the same joints over to the muscle skin. Also i have disabled the smooth skin when im using the muscle skin but i don't delete it, this is because later when the muscles are added and the skin becomes more dynamic it will start to lag when calculating the skin which makes animation harder. So when animating ill disable the muscle skin and use the smooth skin as a guide, then switch back and cash out the muscle skin before rendering.

Masters - WIP - 22


Masters - WIP - 22, originally uploaded by James D Thompson.

Here ive been setting up an n-spine which is a way i can get the spine to twist correctly and without collapsing.

When you make a spine with the spline ik it works well if the character bends forward of sideways but when they twist on the spot the spline cant solve the twist so it stays still which would look odd. There is a twist attribute in the spline ik but its inefficient as it only twists from the top but if we ever wanted to twist from the hips it wouldn't work.

To solve this the spline ik joints are controlling another joint that's in there place with a point constraint, then those joins are aim constrained to a locator that's in front of them. That locator is then grouped and the pivot moved to the spine joint.

The graph above shows how the rotate y of the 3 controls is fed into the rotate y of the locators groups. and if the locators rotate the joints aiming at them will rotate aswell.

With all this in place now if the chest control is twisted the spine will evenly twist from top to bottom giving a nice and also accurate shape.

Masters - WIP - 21


Masters - WIP - 21, originally uploaded by James D Thompson.

Here im setting up the bone capsules for the rig. Using maya muscle systems instead of binding to the joints you bind to the bone capsules. These capsules have attributes like muscle and fat which allow the skin to react how it should e.g. instead of being painted to a joint the skin can slide across much like it would in real lift, this sliding is also dynamic so it will change depending on what you set or how the character is moving e.g. when skinning an over weight character, increasing the fat will allow the flesh to be more loose and jiggle much like in real life and the speed and intensity of the jiggle will be influenced by the inertia of the animation. This means the faster a body part moves, the more sliding and jiggling of the fat there is.

Thursday 22 December 2011

Masters - WIP - 20


Masters - WIP - 20, originally uploaded by James D Thompson.

Rigging up the rest of the arm as usual with an ik.

Also i added another ik for the clavicle so that the actual pole vector also rotates the scapula. If you think about it, if you have your arm bent and rotate it as if your aiming with your elbow (much like moving a pole vector in maya) your shoulder is the part that's actually rotating and your clavicle rotates ever so slightly.

So for this reason ive removed the rotate x coming from the shoulder controls and instead joined the rotate x to a different ik section.

This new IK starts from the same point as the main driver joint and ends on the actual pole vector, the ik is then point constrained to the pole vector control. This way, when i move the pole vector the end joint is rotated by the ik giving me a rotation value from moving the pole vector control. this rotation is then fed into that twist of the main driver. This means the rotate Y and Z are controlled by the shoulder control and the X (or twist) is controlled by the pole vector.

The main reason for creating an extra ik and not just having the twist of the arm rotate the driver joints twist is because in doing so you cause a loop, the driver joint is dictating where the arm should be and the arm twist dictated where the driver should twist which causes bad jittering and flipping as maya is battling with a loop. Creating the extra ik section means the rotation is coming from a section that isnt dictated by the main driver joint so no loop :D

Also i found by placing the rig in extreme poses that the rotation can get a little too strong and cause the scapula to extend too far, so to avoid this i limited the driver joints rotate x to -12 to 12 so there's just some subtle movements.

Masters - WIP - 18


Masters - WIP - 18, originally uploaded by James D Thompson.

Argh...

For this project id decided with the main area around the shoulder as its the most articulated joint but also the most complex and its proven to be just that.

Here ive spent some time trying to get the movement correct which was quite hard as when i got one axis of rotation correct, it contradicted the other.

The main problem is that when raising the shoulder the clavicle should raise up, but then when moving them back they just move in towards the spine and don't rotate which was causing some problems as the joints want to rotate it.

To get around this the top left joint in the image that has the axis displayed is the main joint for the bone and muscle connectors. This joint has an aim constrain that looks at the socket joint soat all times its orientated towards the arm. then its parented to the joint below which is the joint that will lift the clavicle up. Then it also has a point constraint on the y-axis to the ball joint so that when the shoulder is raised, the clavicle also raises, and with the aim constraint keeping it aimed at the ball joint its always level.

So to finish with the top left joint (with the axis shown) is reviving 3 sets of movements to get the correct position and rotation of the clavicle.

Might sound confusing so ill try find a way to better explain this in time for my report :).

Masters - WIP - 17


Masters - WIP - 17, originally uploaded by James D Thompson.

Making the joints for the shoulder is a bit confusing but with some good reference video it becomes more clear.

usually you can just connect the shoulder to a joint chant that can raise or rotate it and life is simple. However when trying to get a better rig with muscles i need to make the driver joints of joints but also the joints where muscles should attach and this means i cant simply just move and orate one joint but i need to be able to connect the scapula clavicle to the arm joints.

To do this i have one joint in the middle which will be connected to a control so you can rotate it. One axis of rotation will raise and lower the shoulders which in turn will cause the scapula, clavicle and there connecting muscles move with it.

The 2nd axis of rotation some the same objects but has more focus on the back muscles where the scapula connects to the spine.

The best thing is to look as some medical tutorials that show both the bones and muscles in full motion and also feel your own muscles and how they move as you move your arm.

Masters - WIP - 16


Masters - WIP - 16, originally uploaded by James D Thompson.

Started to add in the joints which ill later convert to maya c-muscle bones. When placing these joints i decided to first place locators where i want the joints to be, then i vertex snapped each joint as i drew then, this way i don't need to move the joints after there made which would introduce some rotation offsets which might cause problems later on in rigging.

Aslo later ill be creating a way that this can be done with a mel script so im looking into the best way to create the joints for the arm. Currently im thinking i might create a curve witch has clusters connected to controls that can be moved so the user can choose how the arm looks, then have a command that places joint on the vertex's of the curve and parents them together to get the arm joints.

Also ive been naming the bones with an archaeology approach as its the best way to get a details name for each joint. Fore example instead of fingerA01 or something like that ive now used the name "bn_r_proximalPhalanx_5_01" Where "bn" tells me (or later a mel script) that its a bind joint (so a joint to skin with). Then "proximalPhalanx_5_01" tells me that its the start of finger 5, using 5 instead of index or ring finger is because this rig will eventually be designed to morph into other creatures, so if this was to become a fin or wing there wouldn't be a ring finger but there would still be a proximalPhalanx_5.

Monday 19 December 2011

Masters - WIP - 08


Masters - WIP - 08, originally uploaded by James D Thompson.

Via Flickr:
Thank god the spine is almost all the same :D. After making one part of the spine i just duplicated it and re-shaped it for the rest. Jsut getting a rough overall scale for the spine and then ill go back in and fine true the rest to the right size.

Masters - WIP - 06


Masters - WIP - 06, originally uploaded by James D Thompson.

Via Flickr:
Took some working but the pelvis is done to a standard im happy with. the topology want hard to crack but getting it to look correct took some time, still think the loop around the hole at the bottom still looks a bit "chubby" so might change it later but for not im happy :)

Tuesday 6 December 2011

Current work

Currently for my first semester at University iv got a good enough idea of what's going on now its just a case of getting things done :). For my main project im now developing my idea around some sort of rigging script that can adapt to several different creatures and possibly adding in some automated muscle setup.

For work im currently working with some extremely talented animators (and friends) Pauls, Dave, Arran, Ravi and Jason. Were doing an animation about an eye exam which has been a fun experience working on a real project and finding out what's needed. My main roll is rigging and set modelling but im also animating one shot which at first I was worried about but came to like. With animation I still think ive a lot to learn so Im going to try more small animations later on this year.

But the main thing this month is to get things sorted so I can spend Christmas with my amazing girlfriend Zoe, family and friends :)

Hope people have a great Christmas :)

Tuesday 29 November 2011

Zap - Read the fine print


That awkward moment when you hand in your final submission a month early. I decided to take part in the digital tutors but it was my fault that I didn't read the entire thread and dint realise the deadline was the end of December instead of November :D. Learning from that its important to try apply the same thing with other deadline, if this was a University deadline id have plenty of time to improve and get peers to check it so in future it might be wise to set deadline a little earlier than they relay are :)

Saturday 19 November 2011

Zap - WIP - 006


Zap - WIP - 006, originally uploaded by James D Thompson.

This is for a digital tutors contest where we have to create a game prop/weapon (from a pre-excising game or made up) with a max poly quad count of 1000 and 1 texture (thing 512 not sure)

I decided to make my own gun instead of doing one from an excising game as there more creative freedom and its fun to come up with your own ideas.

So i decided to make a sort of retro futuristic tesla gun. This screen show shows the current modeling and rigging complete (just under 1000 polys).

Now its onto the texturing stage but im still unsure which will look best, either retro sci-fi like bright block shiny metal or a steampunk style. At the moment if thinking the more retro as steam punk seems to be everywhere at the moment in films and game.

Wednesday 12 October 2011

Stuff to come

Hi,

Not been many posts on my blog far a while due to starting my masters at Bradford but now this means there should be some interesting masters work and hopefully some more tutorials that might help :).

For my masters i will be focusing on  rigging and animation for games which will include areas such as keyframe and motion capture animation as well as looking into rigging techniques and how to rig unusual creatures. Then finally this should lead towards bringing everything together in UDK.

Also ill be making some Motion capture tutorials soon which will cover things like the methods of capturing, rigging in Maya 2012 using the new human IK and how to import that rig into Motion builder and add the mo-cap data.

Saturday 3 September 2011

Music City - WIP - 005


Music City - WIP - 005, originally uploaded by James D Thompson.

For this project im making a small city based around music so im making the city on a DJ deck and the building based around different instruments. I might add some animation later on if i have time but for now im concentrating on the main bulk of the modelling. Here im just blocking out the buildings as cubes to get a general scale of the buildings and layout of the streets.

Friday 5 August 2011

Skull test


Skull test, originally uploaded by James D Thompson.

Just a test to see what it looks like with a full skull, the two Maxilla bones (top jaw) are the scanned bones im working on that have been damaged by leprosy, the rest of the skull is a bought model.

Tuesday 19 July 2011

Graduation

YEEEEEEEEEEAAAaaaaaaaAaa!!!

Sunday 17 July 2011

Maya Rigging - Cartoon character rigging - 001


Hi, in these tutorials we will start from scratch working through the whole process of rigging a cartoon character. We will cover things like stretchy limbs and facial rigging. If you have any questions please leave a comment and ill do my best to help out.

Monday 4 July 2011

Texturing Workflow - UV's Maya and texturing in Mudbox


Hi, in this tutorial ill go through setting up some UV's in Maya and texturing in Mudbox. I will be using a high resolution scanned model (A Meta Tarsal bone that shows the effects of leprosy) provided by the University of Bradford's archaeology department. I don't go into depth about all the tools around UV's and Mudbox but just the ones iv used in this pipeline and tips iv learnt along the way.

Please post any comments or questions and ill try help as soon as possible :)

Tuesday 21 June 2011

Forever alone bone


Forever alone bone, originally uploaded by James D Thompson.

This is the left Capitate after the effects of leprosy, or the Forever alone bone XD

Just been working on more bones but when i turned it to this angle i couldn't help myself XD

Friday 3 June 2011

James Thompson - 3D generalist Showreel [1416] | Demo Reels

James Thompson - 3D generalist Showreel [1416] | Demo Reels

Hi, FINAL day to submit your work into CG Coach student awards. I've now submitted my showreel and a few supporting images and I hight recommend you do the same if you haven't already :).

The link above is for my submissions so please have a look and vote if you like :D

Thursday 26 May 2011

Friday 20 May 2011

Animation in UDK test


Animation in UDK test, originally uploaded by James D Thompson.

Hi, ive been using UDK for a bit but now that university is over i have some more time to leant UDK.

In this video iv rigged and animated a simple joint chain and used the actorx plugin to export the skeletal mesh and animation to UDK. The inside UDK ive imported the mesh and animation and played it through a matinee sequence.

This might look a little lame at the moment but this was just a test, its the same principle if this was a complex character rig.

The reason im testing this is im planning on taking a Masters degree and my main focus will be animation for games and mainly UDK.

www.jdtanimation.blogspot.com

Thanks to André Wahlgren UDK tutorials.
(http://whalebranch.blogspot.com/2011/02/boxis-guide-to-animated-objects-in-udk.html)

Sunday 15 May 2011

Bone - WIP - 02


Bone - WIP - 02, originally uploaded by James D Thompson.

For this we have to accurately fix some scanned leprosy bones and texture as full hi-res meshes.

The scanned model had some small holes so I started inside maya by filling and adding some edges to the new faces to fit in with the rest of the mesh, this took longer than usual and maya runs slower due to the poly-count. The did a cylindrical map and unfolded the UV's, it wasn't possible to manually stitch the uv as again with the high poly-count but the unfolded version was good.

I then imported the bone as a Obj into mud-box where i loaded the reference photos as projections and painted the bone. The textures had to be accurate as the detail in the image matches the detail on the poly surface.

After creating the texture I rendered back in maya with mental-ray.

Wednesday 27 April 2011

DFI - WIP 07


DFI - WIP 07, originally uploaded by James D Thompson.

Via Flickr:
Brains!

This is the rig for the Haworth cat owner's hands. As you only see the hands there's no point in doing the rest of the character, this relates to other cat cartoons like tom and jerry where you only see peoples legs.

No major changed to the way I rig except ive used the weigh blended skinning method, this way the volume around the wrist is kept when twisting instead of folding up like a candy wrapper :)

This is part of the design for industry group project, the model was made by Pauls Kalnenieks and I did the rigging.

Sunday 17 April 2011

DFI - WIP 06


DFI - WIP 06, originally uploaded by James D Thompson.

Via Flickr:
Note: Skinning not completed yet :)

Rigging done :). This is part of a group project at Bradford University making an advert for the Haworth cat rescue. One of my jobs is the rigging so the 1st one ive done it the main cat.

This rig was adapted from a previous one i made for a friend. From the way this project is going it looks like this is going to be an awesome animation :)

Monday 4 April 2011

DD - WIP - 02


DD - WIP - 02, originally uploaded by James D Thompson.

Via Flickr:
This was made for the "Dare to be digital" application which me and a few Friends at Bradford university are applying as a group to make the game "Magmentum". The design is just to show how the track might work so who ever reads the application will get a clear idea of what we want to make. The actual end design might be completely different as the whole game will depend on the art style decided later on. Hopefully we will get into this competition as im sure we can make something great with such talented team members.

Friday 11 March 2011

The Smurfs - Official Movie Trailer


God dam it... I love 3D animations and films, but some things should be kept original. Ill try keep and open mind as I haven't actually seen the entire film yet but it looks like its going down the line of the new Garfield films, which in my opinion are a bad example or a 2D to 3D cartoon conversion. However we have seen some good conversions as in Looney toon animations but it brings up the question of why then made it a live action film, it could have kept some quality by making it entirely CG and original to the cartoons but it seems that opting for a live action Smurfs will be cheaper and easier to make money from. Overall i love seeing great animation and its good when they can keep things alive like Looney toons but thay have to keep the quality up.

James Thompson - 3D generalist Showreel

Hi, as part of my individual project we had to make a showreel (which i would have made anyway :) ). So here it is, my 3D generalist showreel of the best work ive does over the past few years for my course at Bradford University.

Monday 28 February 2011

What am i - WIP - 60


What am i - WIP - 60, originally uploaded by James D Thompson.

38 min render down to 3 min, now where getting somewhere :D

The previous render i had that took 38 min was HD but had the lowest setting, now, the same setting give me the same render but only at 3 min :D.

The frame above is the same 3min render with an added FG and Anti-alias which brings it to 17min so final gather is adding quite a bit on there; might give some GI a try instead :P

Sunday 27 February 2011

What am i - WIP - 59


What am i - WIP - 59, originally uploaded by James D Thompson.

A little less quality in the render. This is just 640x480 with no FG, GI or anti-aliasing and it took 2:25 min to render so i might be able to hand in something like this with still HD shots of each scene :)

What am i - WIP - 58


What am i - WIP - 58, originally uploaded by James D Thompson.

So far so good, apart from rendering :S.

This shot took 38 min to render :S so I don't think ill be rendering it like this. Ill try cut the render time down in a few days after the animation is done as id rather have some good animation at a lower render quality.

I think for the deadline (4 days) i will have the animation done and a medium render put together and a few more high quality still to show what its actually like. Then after ill render it out in 1080HD, hopefully before the presentation :)

It seems a bit silly to me that this and the showreel have the same deadline as everyone is worrying about there animation with the showreel on to, also there are other projects still on going which cannot get included in the showreel as there not finished yet so it would make more sense to have the showreel at the end of university so you don't have to re-make it.

Friday 25 February 2011

What am i - WIP - 57


What am i - WIP - 57, originally uploaded by James D Thompson.

Making the female robot...

So far it will need a lot more work XD

Im not re-making an entire character as i wouldn't be able to finish in time and there not much animation and screen exposure of the female robot so there no point in making an entirely new character. Ive changed the face and chest which is set up as blend-shapes so you can morph from one character to the next.

Animation WIP

blocking


blocking, originally uploaded by James D Thompson.

This is a play blast from a week age showing the blocking out of the animation :)

Thursday 24 February 2011

What am i - WIP - 56


What am i - WIP - 56, originally uploaded by James D Thompson.

Attack of the multiple robotic muscle dislocation :D

Dont worry nothing is wrong here, just thought id post it as it looked funny. This happens because the muscles are dynamic, so they deform based on momentum and when blocking i had some key frames set to stepped, so snapping from one position to the next makes the explode :D. they work fine after you add some interpolation between the poses :P.

What am i - WIP - Cloth Test

Here im just testing out ncloth to see if its worth using. In my animation the robot grabs hold of the cloth and pulls it off the table so here im replicating what's going to happen to see if i can do it :).

The cloth starts in its rest state, then a constraint pulls it across (the robots hand pulling it), then towards the end it's keyed to stop being dynamic so that when its off screen it doesn't need to be evaluated any more. Also to speed thing up, after im happy with the cloth ill Cash the data so it doesn't need to solve the cloth each time i scrub the time line.

What am i - WIP - 55


What am i - WIP - 55, originally uploaded by James D Thompson.

Global illumination = 1970 funky disco :D.

Just changing the setting of the global illumination to try reduce render time. Here iv set the accuracy to 0 which ruins the render but allows me to visually diagnose where the photons are going. Keeping the GI accuracy up makes it look better but harder to see what needs changing so ill bump it up when im happy with the rest of the attributes :).

Im also quite tempted to leave it like this and see people reactions when they see it :D

What am i - WIP - 54


What am i - WIP - 54, originally uploaded by James D Thompson.

Just keep testing the rendering of the two scene merged together through referencing :).

Wednesday 23 February 2011

Warning - Do not trust this site below

Well it doesn't get more obvious than the title above the link below is a fraud trying to rip people off for free software. The website claims to be selling amazing animation software but its nothing more than a version of blender which is a free software. The screen shots on the website have been copied from blenders website so the whole this isn't to be trusted.
http://computeranimations.org/

Tuesday 22 February 2011

What am i - WIP - 53


What am i - WIP - 53, originally uploaded by James D Thompson.

This is more or less what the final rendering of the male robot is going to look like. In this render though he looks quite bland as there's no lighting and its just using final gather so when he's rendered in the finished scene it should add a lot more detail :)

What am i - WIP - 52


What am i - WIP - 52, originally uploaded by James D Thompson.

This is the final look for the room, a few more textures to change (mainly the green part of the wall to the left) but im happy with the rest and the lighting so ill be signing this part of very soon :)

Another reason to use Digital tutors

If you ever did need another reason to use digital tutors here's a prime example. I was having trouble scaling some muscles with my rig so I posted a question on there help forum to see if anyone knew. At first I was just expecting no one to answer or at best a small comment or link to something but not too long after posting, one of the DT staff actually went out of his way to create a small video tutorial on how to do it. Its this quality of service that relay distinguishes digital tutors from other tutoring services.


Ask DT - scaling maya muscles? from Digital-Tutors on Vimeo.

Saturday 19 February 2011

What am i - WIP - 51


What am i - WIP - 51, originally uploaded by James D Thompson.

Using dynamics is helpful even if its not used in the correct way. Here i needed to attach this power unit to the robots chest, however I didn't want it to deform so i couldn't skin it the same way i did the chest. Also couldn't just parent it out use geometry constraints as it wouldn't stick to the mesh and when the spine is animated it would detach.

So i used Maya hair :D. Maya hair works by having dynamic hair attached to the mesh with hair follicles; the follicles are a small node that sticks to a surface using its uv information. So i made one hair follicle, deleted the hair as i didn't need it and just parent constrained the power unit mesh to the follicle. This way it follows along with the mesh perfectly with no deformation even-though the chest is deforming :D.

Road Runner 3D: Coyote Falls


Superb animated short "Coyote Falls". I saw this a few months ago as the intro to the film "Cats and dogs 2". At first I thought "oh god they've jumped on the 3D bandwagon" not knocking 3D but I just think some classic 2D cartoons should stay in that medium. However after watching it I was surprised as to how well they have kept it to the original and this opens up a whole new area of 3D where more cartoon style over the top deformation is possible. In the past its been hard to get this sort of cartoon animation due to restriction in rigging, If you want a 2d character to stretch and grow multiple arms at the same time you just need to draw them but in 3D you need the integrate them with the rig and the characters mesh and make them all work together. However in recent years we have seen more of this 3D over the top cartoon animation like Presto and Bob, Bob is literately a blob with 2 arms but the stuff he can achieve is awesome and fun to watch :). With the advances in 3D animation it seems this sort of rigging and dynamics is becoming more available so hopefully in the future we will see more of these amazing animations :D

Tuesday 15 February 2011

What am i - WIP - 50


What am i - WIP - 50, originally uploaded by James D Thompson.

Finishing the blocking out the animation.

Just by adding a simple rig to the main camera has helped a whole lot with the camera animation, trying to get nice arcs between shots can be hard when animating from one pivot point. In this shot the 1st camera arm lifts the camera up, the camera handle rotates to track the robot, then the main controls is slowly moving along the floor which has given quite a nice camera movement :).

The actual camera for the rig is just numbs curves parented together to make something like an actual film camera tripod on a track.

Thursday 10 February 2011

Digital Tutors January winner

www.digitaltutors.com/forum/showthread.php?25301-Jan11-Contest-Winner!

So chuffed that my entry won the January competition :D

Tuesday 8 February 2011

What am i - WIP - 49


What am i - WIP - 49, originally uploaded by James D Thompson.

Rigging is a different type of art.

Im using referencing so im able to animate and update the rig as i please in a different file :).

It was hard to skin at first as the separate polygon object have to have seamless paint weights where they meet, otherwise they would separate when animates giving gaps.

Ive also been using Muscles but for the most par ive been sticking with the normal skinning. However for small parts that sit on the end of each muscles ive used the muscle skinning, this makes it easier for the smaller parts to follow along with the muscles instead of setting up a load of set driven keys and constraints.

The muscles on the neck were tricky as you cannot use muscle weights and skinning weight together, you have to convert to one. the problem was that the chest using a joint based spine so it must be skinned to joints, so to get around this i attached some joints to the muscles and have them skinned to the chest as well. This way the muscle drive some joints that drive the mesh so avoiding muscle weights :D

There are quite a lot of joints in the shot above but not all of them are used for skinning. Things like the spine has a set of driver joints, these are joints that drive other things to make the rig work but shouldn't be used to skin with.

Sunday 6 February 2011

blend test


blend test, originally uploaded by James D Thompson.

Just a HD blend-test for showing some models in wire-frame. might include this as a turntable render for my show-reel.

Saturday 5 February 2011

Cheers for the comments

When posting work and tutorials on here and you-tube it often feels like throwing a pebble into the ocean and not really making much of an impact. However for checking my Google mail (which I don't check often) iv just found some nice feedback from people who read this blog and watch my tutorials. Cheers for the feedback im glad I can help and im happy you take the time to read and watch my videos, ill try make some more soon :)

Dean's complete rig


Dean's complete rig, originally uploaded by James D Thompson.

Character by Ilze Kolosovska, I'm just doing the rigging :)

This is the final rig for Dean. He was a bit awkward as his limbs are small and chubby so it was essential where the joint were placed on his legs and arms.

The rigs main functions include IK to FK arms, stretchy arms and legs and a stretchy n-spine. The screen shot on the left shows the entire rig with all its components (no including node based systems) and the shot to the right shows what the animator will actually see so the rest is there just hidden working behind the scenes.

Wednesday 19 January 2011

What am i - WIP - 48


What am i - WIP - 48, originally uploaded by James D Thompson.

I decided to merge the whole thing as it makes it look more realistic. From doing this I had to correct the topology but now I'm happy as it looks quite nice and clean and ill be able to use it in other projects.

as the heart is going to be removed from a character i dint want to make it too complicated to al the different vain and arteries all converge to a main port.

I have a few designs for what holds the hears, mainly a fluid filled sack but at the moment im still not sure

What am i - WIP - 47


What am i - WIP - 47, originally uploaded by James D Thompson.

Starting on one of the main props, the robot/human heart.

I was tempted to use a free model for the heart but i decided to give it a go and make it myself. I thought it would be harder than it actually was so hopefully ill have it finished soon. The idea is that its a human heart hooked up to some mechanical and electrical systems. It will be used when the robot realises it wasn't original his and decides to remove it and give it to another robot, sacrificing himself.

At first i was going to have some sort of glowing iron man fully mechanical heart but as the story has changed slightly i decided to make it a real hear, also i think this will strengthen the emotions as a real hear seems more of a symbolical sacrifice than a fake one.

Friday 14 January 2011

What am i - WIP - 46


What am i - WIP - 46, originally uploaded by James D Thompson.

Ah, dynamics can save a lot of time. For some props iv used dynamics in order to get a quicker and more realistic result. One example of this is where the wire's dangle from the ceiling, instead of modelling each wire or using curves, i simply used maya hair, added gravity and set it to collide with the floor and other props, then used the hair curves to loft along.

In the example above, this prop isn't the main focus so i didn't want to spent too much time making it, its just to hint there's a body underneath. So i made a simple human figure, made a plane the size of the cloth and used the nCloth dynamics for the cloth to collide resulting in a quick and easy cloth prop. After this I can still add some more details with the sculpt geometry tool but ill then delete the history and past it into the main file so its just a polygon mesh object with no ncloth.

Thursday 13 January 2011

What am i - WIP - 45


What am i - WIP - 45, originally uploaded by James D Thompson.

This is a render of the new props to see if they need any changes. Some look a bit bland as they don't have any textures yet.

Im quite happy with the lighting so far but i still might dim it down a little, the medical light doesn't have any lights yes,its just a surface shader glow, so i might dim that area down so most of the light is emitted from the medical light. I might also try adding -light, using programs like unreal engine 3 when you add a light with an negative intensity it removes light from that area, not sure if it works in Maya though.

Another method I might try out is light linking. This is a way of setting what the light can actually illuminate (by default its set to everything), so for example i could have some lights on the floor that only illuminate the ceiling, this way the walls stay the same and the lights don't effect a character walking over them but they can help illuminate the roof and fake a large amount of secondary illumination that you would get with using final gather.

What am i - WIP - 44


What am i - WIP - 44, originally uploaded by James D Thompson.

Just a wire frame shot of the new layout and props. I will be adding more props in the area and some more details soon.

The little black dots scattered around the scene is the map vis of the global illumination . These dots tell me where the GI photons are going and areas they might be too many or too little.

What am i - WIP - 43


What am i - WIP - 43, originally uploaded by James D Thompson.

As the story has changed, so has the atmosphere of the room.

I've made a few more key props and will be texturing them soon. So far there are only 7 lights, 5 for the ceiling and 2 from the window and hole in the wall. I've set up the lights with global illumination as it reduces the render time considerably. This render only uses global illumination and no final gather.

I've now got more time and a better idea of what happening in this animation so hopefully ill be able to get a lot more done :)

Oliver rig - WIP - 07


Oliver rig - WIP - 07, originally uploaded by James D Thompson.

Hi, this is a wip of a rig I'm creating for Ilze Kolosovska, the character is 100% her's I'm just doing the rigging :)

I've started with the arms and legs and setting up an IK FK switch for them both. Also ill be making them stretchy limbs and spine :D.

Hopefully ill be able to include this and some other rigs I'm working on in my individual project.

Ilze's work : www.flickr.com/photos/sniegasunc

Sneaky Russian dogs - Facial animation


This is the final version of my facial animation :D