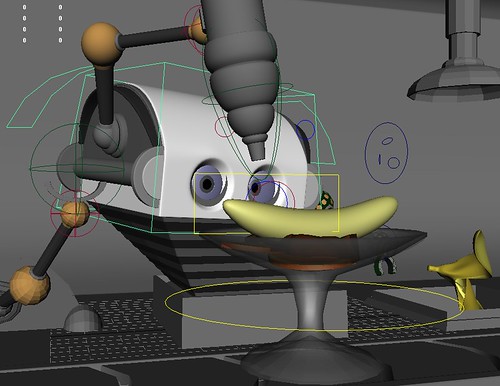
Thursday 26 April 2012

1C3 - BOT


1C3 - BOT, originally uploaded by James D Thompson.

Via Flickr:
Final render used in the presentation but might have some changes for final submission.

Had fun with this as ive not use nparticles before and only ncloth a little so there was a lot to learn.

Decided instead of doing a few boring examples of dynamics it would be better to add some character animation. This helped as this is the industry im aiming for and having the character affect the dynamics presented its own challenges that I have to test and overcome.

The overall shadring/render isn't great so that could possibly be improved as well as the animation but overall im happy with the final result.

Music: The real tuesday weld - clerkenwell kid

Monday 23 April 2012

Ice - WIP - 0013


Ice - WIP - 0013, originally uploaded by James D Thompson.

Via Flickr:
"Just a little dab here"

Finishing off the animation and adding some more N-particles.

Ice - WIP - 0012


Ice - WIP - 0012, originally uploaded by James D Thompson.

Via Flickr:
Here is decided to have the robot slice the banana skin with a beam in 3 splits. This means i want the skin to start falling over around 100 frames from left to right.

However the N-cloth all falls at once so to fix this i created come transform constrains that switch off in sequence from left to right so now the banana starts to split, making it look like its opening as the beam passes through.

Thursday 12 April 2012

Blend test 2


Blend test 2, originally uploaded by James D Thompson.

Via Flickr:
Same as last video but with the double offset fixed. All made through Mel procedures hooked to the GUI so its easy to use for non-riggers :).

Blend Test


Blend Test, originally uploaded by James D Thompson.

Via Flickr:
Feeling all excited as this is the first glimpse of how it might look when everything s all working together after just writing blocks of code for the past few days.

This shows the slider in action, blending from a human arm to the bat arm, as you can see the user can have either, or a blend of both. The sliders are also key-able which doesn't mean much but I can use that later when creating a demo of the script.

At the moment the bat arm is twice the size as the human, this is because (for debugging purposes) i've made the human arm the default arm when everything is made, so when blending its actually a bat + the human arm so everything is doubled but now i know things are working the default will be 0, 0, 0, for all the controls, then the user can slide the human slider up to make the human arm or make the bat wing and it wont double up as it starts from the default 0, 0, 0.

HR - WIP - 012


HR - WIP - 012, originally uploaded by James D Thompson.

Via Flickr:
Making a bat wing out of an arm.

Now that the whole thing it working, now I just need to input the translate values of the different limbs. To do this im going to just use the limb maker ive already got as a template, move the spheres and just note down the values.

Once its done ill store the values in a matrix in mel and assign the values to the blend col nodes, so when sliding the sliders the blend col nodse blend from 0, 0, 0, to what ever value i find here.

Wednesday 11 April 2012

HR - WIP - 011


HR - WIP - 011, originally uploaded by James D Thompson.

Via Flickr:
Just the first 2 tabs at the moment with a few functions working.

First tab shows a list of connection objects and some buttons to add selected objects (if the user want a custom connection object) or a text field to enter the name of a connection object if the object is hidden or hard to select.

Then a finalise section (still wip) which adds the final selection in the list to a string in mel which will be used for the limb builder to find the connection object e.g. if the connection was spine_clav, the limb maker will find the position of the "spine_clav" and connect the new limb to it.

The second tab ------------------------

This tab ask's the user to type a prefix (That will be added to the names of the limb). Then select a mirror function, then how many finger/phalanges.

When the build button is pressed it will take all the information in the GUI and pass it to the limb maker procedure shown in previous WIP's.

Also after the build the limb will be hooked up to the sliders, so now changing the sliders will make that limb, this also works in real time so as sliding the actual limb will update at the same time.

Monday 9 April 2012

HR - WIP - 010


HR - WIP - 010, originally uploaded by James D Thompson.

Via Flickr:
Having fun getting the window ready.

How it works------------------------------------------------------------

I started making a window a few months ago but found it relay hard as I was still re-familiarising myself with the Mel syntax and windows are one thing that are quite awkward to get working.

To start off with all window i make have an if statement that sees if the window is already there and if so delete it. This is because if the window is already there the new window will have trouble opening, also windows can be open but hidden so just having this if statement forces it to delete even if hidden, then re-open.

To start off with i made the window with all its elements but decided i wanted tabs across the top. So the idea is you complete the tasks in each tab then move to the next, this avoids having a huge window or after each step opening a new window.

To get the tabs working was annoying at first but the best way to get it working is using a string as the child for a tab, having that string contain a columLayout command, running a procedure after the string, then a set parent to attach the procedure to the columnLayout. The procedure that was run and attached is actually just a procedure that contains that tabs elements, so all the text buttons and any other columLayout commands.

So basically its like making a window in a procedure ant attaching it to a string that is in the tab, then for the second tab ill just create another procedure with all that tabs elements in it.

What's it for?-----------------------------------------------------------------

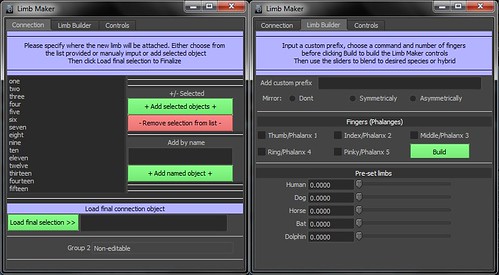
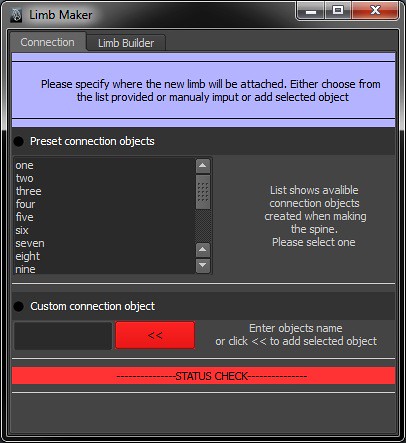
This window is the main limb maker, so the 1st tab ask the user to select where the limb will attach, so if its a arm you would want it on the scapula and legs on the pelvis but for some creatures they may have 6+ limbs or even some strange creature that has arms for legs. So this is basically asking the user to either specify a part of the spine that ive set as a connect area (for most characters) or specify there own object for more custom/advanced riggers that have a special case where they need to define there own (or even if they didn't make the spine earlier or have made there own).

The next tab after selecting the connection object will run the limb procedure, attach to where the user specified and contain the sliders for pre-set limbs.

Then other tabs may include setting up IK/FK and custom/procedural control curves.

Sunday 8 April 2012

HR - WIP - 009


HR - WIP - 009, originally uploaded by James D Thompson.

Via Flickr:
Really liking the power of mel.

When I first started with mel I kinda went into it with a bad attitude as "eww its programming, ill just do it to get it out of the way".

The main reason for doing it as its an essential skill for any rigger but now im approaching it in a rigging way (a way i like) its starting to make more sense and the results are quite fun :).

Here ive made a procedure so for every sphere control i make, it also calls on a "blendConnect" procedure which basically makes a +/- Average node, hooks up 5 colour blend nodes then hooks the average out 3D to the spheres controls group.

This means the user moves the sphere in the view-port, then the average node moves its group (which in-turn also moves the child sphere control). The blend colour nodes have true which will contain the values of the pre-set (x, y, z translate where the sphere control should be) and a false (0, 0, 0) which means no movement.

The blend attribute will later be hooked up to the GUI, so as the user slides the slider, the whole arm will blend. Also the user can blend a few sliders (e.g. 0.5 human, 0.7 horse) then they can tweak the sphere controls manually to fit there mesh.

Saturday 7 April 2012

HR - WIP - 008


HR - WIP - 008, originally uploaded by James D Thompson.

Via Flickr:
Now the process is working for one curve i can just apple the same to the rest.

So here we have the full arm with the spheres to move and curves just to show the user where the joints will be going.

Now im going to connect this up to the GUI with the pre-set sliders and apply the same method to the legs.

HR - WIP - 007


HR - WIP - 007, originally uploaded by James D Thompson.

Via Flickr:
Might not look like much, well it isnt :D, but making it through mel was.

Here are some sphere controls made through a procedure and some curves that get each cv clusters through another procedure.

What they are it a representation of where the arm will be made, so the user has the ability to choose a pre-set in the GUI, then manually move the spheres to fit there character mesh.

Then when the user is happy with the arm, the will click apply/covert to joints and the curves get fed into a procedure that places joints on a curve, then parent them.

Now ill input the curves for the fingers.

Quite liking this method of making joints and might attempt to make a joint tool later on using this method. as drawing joints this way you can move the spheres how you want and then create a clean joint chain, instead of moving/rotation joints and then fixing the orientation later.