Sunday, 12 December 2010
Thursday, 9 December 2010
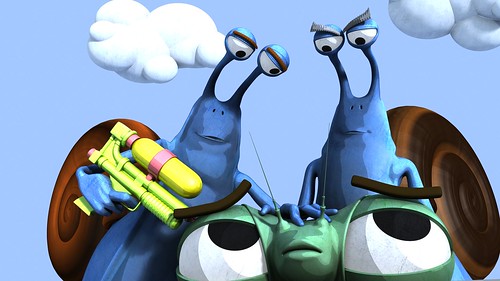
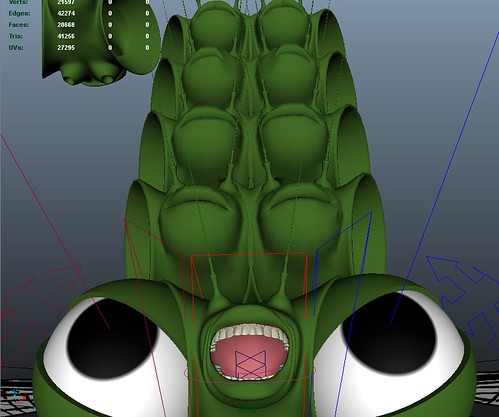
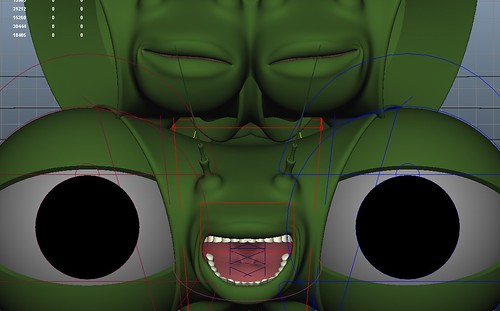
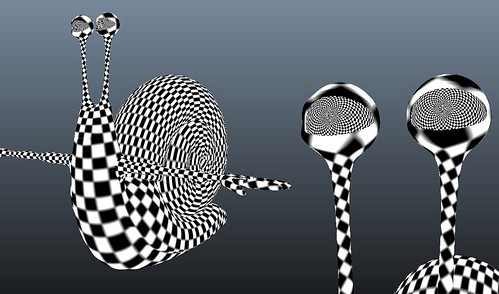
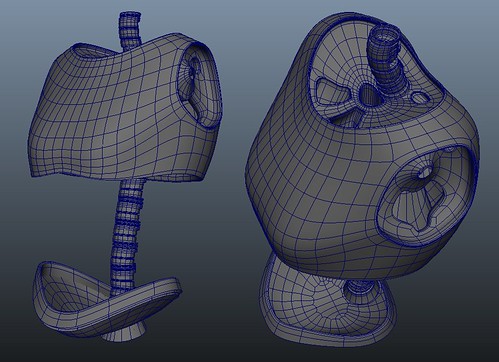
Facial animation - WIP - 06
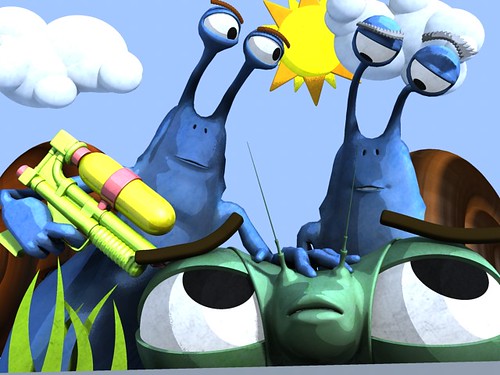
Added some grass but I'm not sure about the sun.
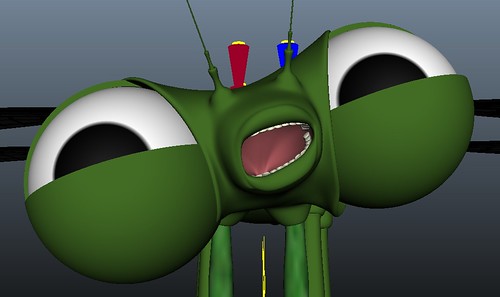
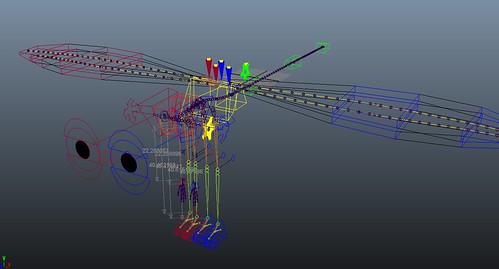
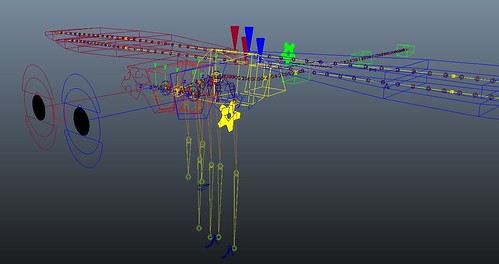
More animation done. Started to make the actions a bit more snappy. One problem I had was the antennas are parented to the head which is good for most of the animation but for some parts I want the eyes to stay still whilst the body moves, then have them catch up. I should have rigged it so there is a parent blend like I did with the dragon fly so ill add this to the rig after. To get around this I made a locator, snapped it to the eye controls on the frame they stop, then every frame after that I snapped the eye controls to the locator, this way I was able to have the body move with keeping the eyes fixed which worked out well :D
Also added some more lip-sync so not much left to do in that area.
One tip is to set the keys for the lip sync where you hear the sound so you can get the correct timings, then move all the lip sync keys back 1 frame and this make it look more natural. I suppose this is a sort of anticipation, when you talk you move you're mouth into the position, then you make the sound, you don't do them at the same time.
Another tip is to set the interpolation of the lip sync animation f-curves to linear, this is because the mouth moves very fast, so you need to move between the poses quickly. Also biologically, facial muscles are small and tight and don't jiggle like other muscles, so removing the ease in and out makes it look more natural as well.
Wednesday, 8 December 2010
Full 1080 HD Test
This is a full 1080 HD render test with high quality setting to see if the shaders wokr in HD. this took 30 min to render due to the quality setting but i wont be rendering the animation to this quality as it will take too long but i might after for my showreel.
For best quality view it in its original size as its HD :)
Friday, 26 November 2010
Facial animation - WIP - 02
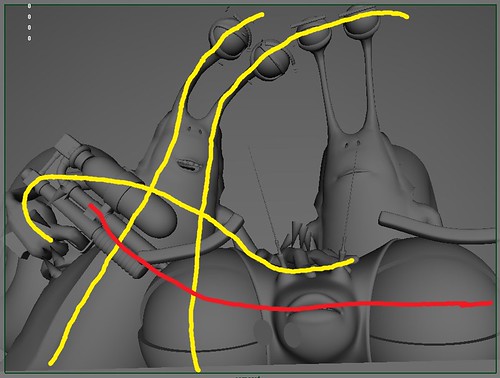
Decided to slow down a bit before I start animating as that was my main downfall in previous projects.
Ham Luske said "Your animation is only as good as your poses. You can have good timing, good overlapping action, good follow through but if your poses are not strong and to the point (telling the story) you do not have a good animation."
So ive started to think more about the key poses and the story there to convey. In this image ive started to do the key starting pose for Tony (left). To try and link him in with the other characters im trying to concentrate on the line of action. making his arms flow into the main areas of interest and using his antennas to lead you eye to the character Avi (right).
The lines indicate pulling the scene in, Tony flowing from left to right, then Avi right to left (Avi hasn't been done yet) creating a claustrophobic scene for the dragonfly's line of action constrained between the other two.
Thursday, 25 November 2010
starting animation
starting animation, originally uploaded by James D Thompson.
Just started doing the animation, for this i decided to block out the whole scene for the "Avi" character using a pose to pose approach, then build-upon the in-betweens with a straight ahead approach.
The last two actions need to be a bit sooner and snappier but this is working as a 2nd pass. after this ill start on the facial animation and do a final pass at the end to make it nice and shiny :D. ive decided to do the facial animation in the middle as ill need the general position of the character to make the best facial pose for that angle but I also want to get the facial animation started early so its not all left to the last phase.
Facial animation - WIP - 01

Started to bring that characters together using Maya references.
Using references I'm still able to edit the entire character whilst animating, it work by loading in the characters from there own .ma file, so the scene I will be animating in only contains the animation data.
So far im just setting a few poses, the shading is off as ive not made any environment or lights yet, also I might drop the cell shaded look depending on how it goes.
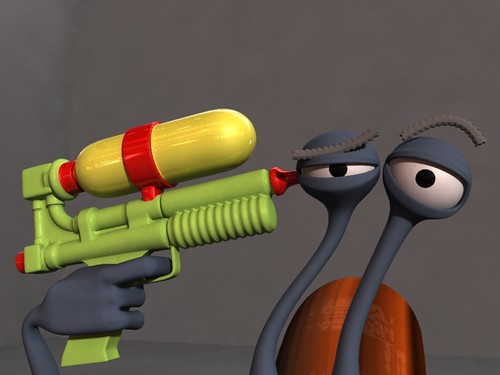
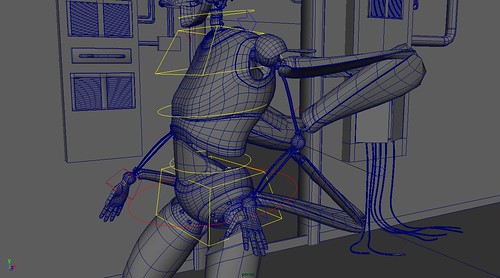
Barry - WIP - 18
Been ill for a few days so not got much work done :S
decided to start on gun but instead of making it real I decided to make it more comical by using a water pistol :D
The gun itself is just a few simple polygon meshed all using the same shader that has a round corners bump node, which helps blend the hard edges where tow polygon objects meet. So overall it sort of looks like its all one piece of plastic.
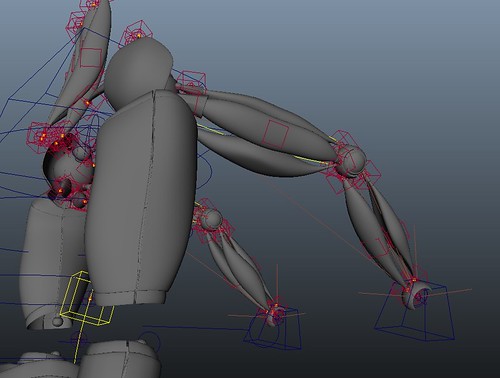
Barry - WIP - 16
Decided to add the same blend parent node based rigging i used for the dragonfly's tail, so his antennas can be set to follow other objects e.g. he can grab it then the eye will follow the hand.
I also decided to scrap the joint based facial rig as it looked like it will take too much time. I might apply if after when ive done the blend-shapes for the mouth so both can be used :)
Tuesday, 16 November 2010
Barry - WIP - 14
Decided to make him even more over the top cartoon style with stretchy eye lids.
For most part of the rig its entirely joint based for the deformations, then some blend-shapes added on top for the finished result.
For the eye lids though its entirely joint based as to get this same result with blend-shapes would take a lot of time and several blend-shapes.
There was virtually no paint weights needed as a default smooth did did a great job, the only area that needed fixing was the back of the eyes, so i created a chain of joints to hold the back in place as the lids stretch.
The main reason im making him so stretchy is because im planning to make a few more shorts with him :D
Monday, 15 November 2010
Save UK animation
Absolutely discussing, the fact that animation is such a huge and profitable industry means that if UK animation was funded it would put more money back into the economy than it takes out. Just another indication that the labour party are a bunch of short term money garbing idiots that have no idea how to run a country.
Barry - WIP - 12
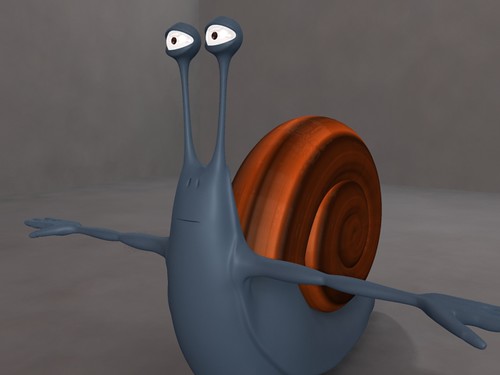
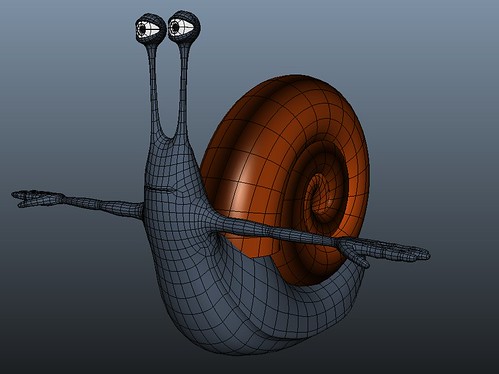
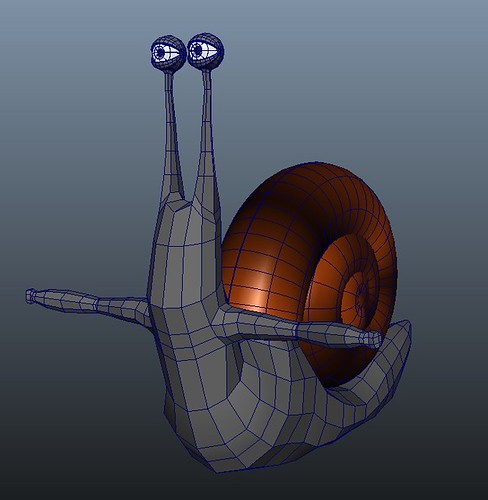
This is a shot of the complete snail rig minus the facial rig. All thats left is to start the snails blend shapes and connect it up to its GUI.
I decided to do the snail after the dragon fly as there are 2 snails and they have most of the dialogue, so learning for mistakes i made and over came from the dragonfly's face ill be able to make this one better and faster :D
Barry - WIP - 11
Just a test render to see if the rig isn't affecting any shading.
One important thing ive learned is signing off a job before the next, so im 100% sure the rigging is complete before i animate. otherwise i might get half way through animating when something crops up and ruins it.
Ive rigged the whole thing and set up the UV's so later on i can create the textures without ruining any of the rigs skinning.
Tuesday, 9 November 2010
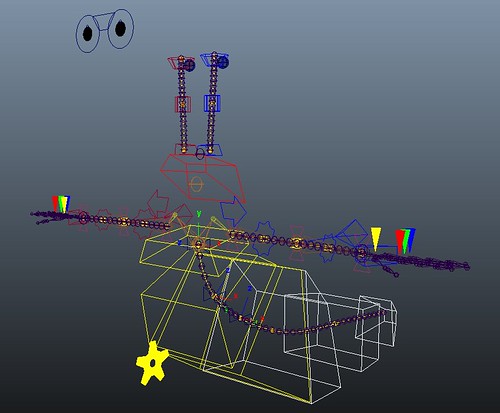
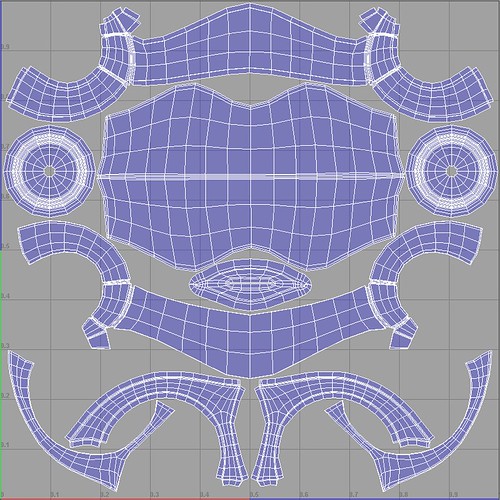
D-Fly - WIP - 18
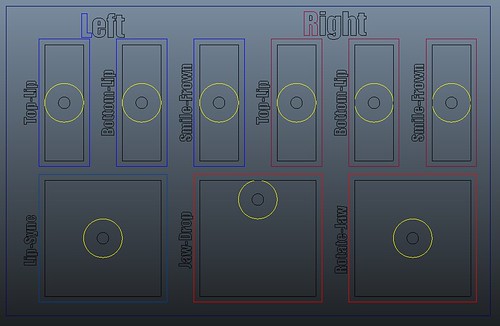
Decided to layout the facial rig like many other rigs ive used before as its very easy to work with and animate :D.
Ive split my blend-shapes into left and right so im able to manipulate them individually. then combined some blend-shapes and jaw rotation into the Lip-sync control.
The lip sync controls works by: Top left = wide + closed, top right = narrow + closed, bottom left = wide + open, bottom right = narrow + open.
On top of all this i might add some small controls on the face that are attached to joints to I can add some more offset in the animation to make it look different :)
This grid like layout is also discussed in the book "stop staring" with scripts to make it but i didn't use them for this as i wanted to make it all myself from scratch for practice :D
Monday, 8 November 2010
D-Fly - WIP - 17
Perverted dragon fly :D
Adding more blend-shapes and splitting them into there left and right parts. so far things are ok sol ill start to move onto more complicated shapes.
D-Fly - WIP - 16
Here I have used the script SS2 taper (as described in the book "Stop staring")
I made a smile blend-shape that had both sides smiling, then I used the "paint blend shapes weight" tool to paint out one half of the smile. then using the SS2 taper script it split what I had painted into 2 shapes (1 shape what I painted and another with an opposite paint). this gave me a left and right smile as different shapes, then when combined they give a full smile, this way I'm using 2 shapes instead of having to make one for each side manually and trying to get the the same by hand.
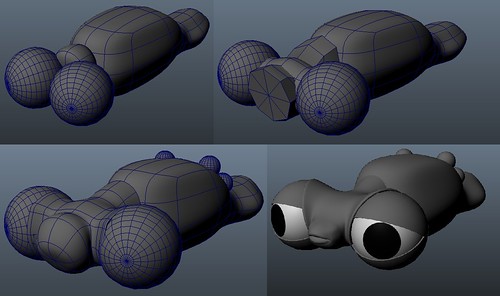
D-Fly - WIP - 15
Surprised face... made the jaw bone and painted the weights for it before I make the blend-shapes, this way when testing the blend-shapes I can see if they also work with an open mouth :D.
I made 3 jaw bones wit an offset so when I rotate the jaw control, the 1st joint moves 100%, the 2n 60%and the 3rd 30%, this way the chin creases and compacts nicely :), also it makes paint weights easier for better deformations.
D-Fly - WIP - 14
Decided to try out adding some subtle toon shading. I like the way it looks with some textures and mental ray shaders so I didn't want to make it 100 matt toon shaded so its a blend between the two.
What am i - WIP - 42
Mr muscle :D. the reason this is happening is that Maya’s c-muscle are dynamic, so the react to higher velocity by jiggling more. So… if you use a stepped tangent or instantly re-pose a character in the next frame, the muscles see this as a huge change in velocity as they have essentially moved a huge distance in 1 frame, so they jiggle to the max. To solve this each time I make a sudden pose change I start the animation in a new scene file referencing the same room and character, this way they animation curves start again from frame 1 in the new scene and the muscles can keep cool :D.
Also the muscles in this show are from my animatic which doesn’t have the muscles setup to how they should be so the jiggle values are too high as well.
Saturday, 30 October 2010
What am i - WIP - 41
What you can see here is the muscles rigged :D, now all I need to do is skin the mesh to the muscles to get them to follow along. But... to my horror, when I started to bind the mesh through muscle skinning it didn't work!!! :0, the reason was some connections had broken on the left arm and I was unable to get the muscles to influence the mesh. To solve this though I was able to import the muscles from a previous save where they were still working :D. So now I've got them working its off to rigging the rest :)
Wednesday, 27 October 2010
Maya tips - Hypershade
Tuesday, 26 October 2010
D-Fly - WIP - 13
This is the same rig as the last WIP shot with all the extra bits hidden, the remaining controls are the ones that will be animated :). To hide the rest of the rig, all the parts that are going to be hidden are placed in a group called "parts to hide" this way as there all in one group i can set the groups visibility to 0 to hide them all, then if I need to modify the rig I can simply set the visibility to 1 to show them all. This will save a lot of time as if I had just set the visibility to 0 on each object, if I wanted to edit the rig id have to find all the objects and make them visible which would take some time. I have also used groups for objects like all the IK handles, control curves and joints. By doing this its easy to keep track of the rig and what parts can move and what parts keep still to avoid double transformations. This is helpful as if they were just in one big group, scaling this group would scale the control curves, the the muscles so it would blow out of proportion. Also if i do scale the group, its connected to the node based stretch arms and legs, this is because a stretch rig depends on the distance of the arms and if the rig is scaled, the stretchy rig wont work as it still thinks the arms are the old length. to avoid this the groups scale acts as a multiplier for the stretch rig, meaning if i scale the rig, it also updated the stretchy distance values.
D-Fly - WIP - 12
This is just a screen shot of the whole rig and all its working bits but most of it is stuff the works behind the scenes and will be hidden so only the animation controls will be seen when animating to make like simple :D
Saturday, 23 October 2010
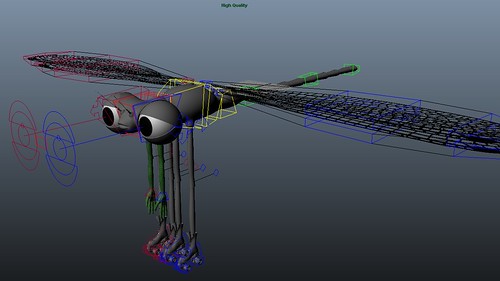
D-Fly - WIP - 10
This is a shot of my rig so far not including the facial legs or arms yet. There are a lot of things going on but most of it is behind the scene and will be hidden when the rig is finished and ready for animation, so when animating its easy to see what controls are needed :D. There are quite a few long chains of joints but this it to keep a good resolution of deformation if the limbs are stretched :D
D-Fly - WIP - 09
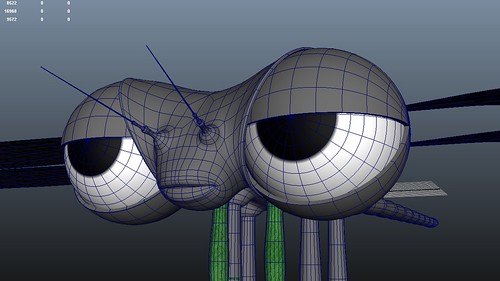
All work and no play make dragon fly tired. The eyes for this were quite interesting. The eye and its lids are kept solid but thy can droop independent from the head similar to the snails antennas which allows for some extra emotion.
For the shot above is just rotated the head slightly forward which makes him look more tired or more angry, by rotating the head back he appears more nervous and scared. So even with the same facial expressions the position of the head can add subtle emotions that will re-enforce any expressions added. So when animating for facial animation don't forget the head :D
D-Fly - WIP - 08
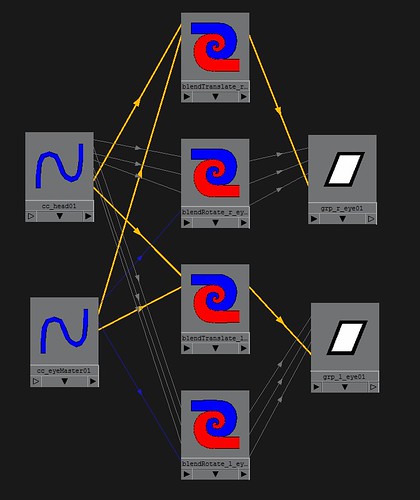
I love node based rigging :D. Here is how ive rigged the "Follow" attribute of the eye controls so they can either follow a master control so the eyes can follow an object, or they can follow the head, so the eye's stay fixed with the heads movements.
I first used some parent constraints but the popped when I changed the weigh if i wanted the eyes to stop following, so using nodes I was able to blend the two parent objects without using constraints. This way a blend of 0.5 means 1/2 of the position is coming from the head and the other 1/2 is where the master eye control is, this means I can smoothly blend between 2 controls and avoid any annoying popping.
In the long run this means i can avoid any extra counter animation if i want the eyes to follow different thing then his head, without this id have to tweak about with key's trying to hide when the eyes pop.
Thursday, 21 October 2010
rig like an Egyptian...
rig like an Egyptian..., originally uploaded by James D Thompson.
just doing a teat combining the stretch bend and jiggle parts of the rig working together, here ive only animated 3 controls for the arm and the COG (centre of gravity) of the body.
So far the stretch has no control over the volume of the arm so it doesn't shrink as you stretch it but ill try fix that soon :D.
D-Fly - WIP - 07

Ive started to texture some parts of the dragonfly :D. so far im keeping texturing a low priority as ive set up the uv's so im able to apply the textures after rigging with no need to add any history. I like the look of the scales on his arms but i might modify the textures so there a bit more cartoon style almost vectors, then maybe even render in mentalray with a cell shading feel.
D-Fly - WIP - 06

Here i have started rigging :D. Ive started rigging this before i finish the snail as im wanted to to both stages of the rigs at the same time so im doing the muscles and rig for both one week, then the paint weights the same time the next week.
When rigging my preferred approach is to sketch some plans of how things might work, then create the control curves first. This way i know all the controls i need and what constrains they have instead of adding more controls at the end and finding out i have to delete and re-constrain things to get the new controls to work.
Other things I've added are simple 2 point nurbs curves with clusters at either end so i know what controls are attached to whet e.g. the eye controls have one end of the line attached to the eye control and the other to the actual eye it controls. This way when animating i can easily see what controls do what and where a control might be hidden.
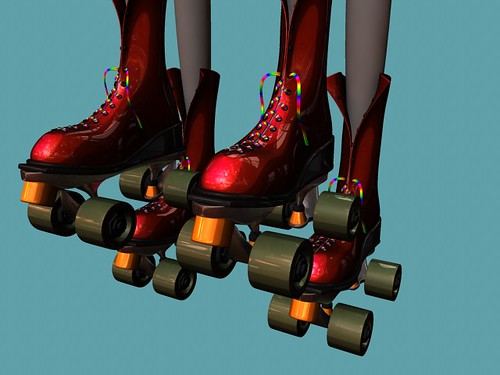
D-Fly - WIP - 05

I was stuck on what type of shoes or feet he might have but after brainstorming some ideas I came up with old skates :D.
I decided with these as the character is quite large but with long thin legs that make him look unbalanced and clumsy so to add to this he's now in 2 pairs of skates :D. Other animation ideas I might use this character for is some sort of stunt dragonfly that has to gain speed with the roller-skate before taking flight.
Wednesday, 20 October 2010
Barry - WIP - 10
This is the rig so far but don't worry, most of what you see here will be hidden and locked away never to be animated as there just there for rigging. The arm has several controls as it uses an IK/FK setup that drives the stretchy muscle rig but it will all be hidden only to show the actual controls that need to be animated.
Tuesday, 19 October 2010
Barry - WIP - 09

This is one of the stretch arms with no mel :D.
I have a measurement tool connected to the clavicle and wrist joints so I know the length of the arm.
So this is how maya reads it :)
1) The condition node asks, is the distance tool less than or equal to the arms default length with no stretch.
2) If true, the arm is either in its normal position or smaller, so we want no stretch as we want to bend wit Ik so the joints scale = 1.
3) If false (i.e. the animator has stretched the arm by moving the wrist too far) then the values for the joints scale comes from the multiply divide node.
4) The multiply/divide node takes the current length of the arm (the distance tool) and divides it by the length of the arm at default. So e.g. if the default length is 2, if there is no stretch the arm length will = 2, so there divided to = 1 and the joints scale is 1. if the arm is stretched to a length of 6, the its 6 / 2 = 3. This way the arm stretches as you want it to, without this the arm would scale + the defaults arm length, which leads to a huge pop when stretching and a massive offset which leaves the arm stretch useless. But with it it works :D
Also, if you reduce the "default arm size" this means you can shrink the arm before it bends with the IK
Jiggle test
Jiggle test, originally uploaded by James D Thompson.
This was just a jiggle test :D. im using muscles and splines for the whole rig. The arms contain about 20 joints (excluding the hand) but the can go into IK or FK, with full stretch and jiggle in both modes. There are a lot of joints as when the arm is stretched there needed for a good arc. The jiggle values can be keyed so he can have a solid stiff arm to complete jelly, the arms can also bend and twist like a Mexican wave whilst still jiggling and following either FK or IK :D.
I've done the same for the chest, tail and antennas. In the video I haven't edited any paint-weights ive just used the default setting.
Also, it might look quite complex, but when animating most of the controls you see are hidden as there only for rigging and wont ever be animated :D, you only need to animate the arm as normal, then edit the jiggle values if you want.
The jiggle is dynamic... so it depends on the speed of the movement e.g. if the jiggle was set to a jelly like state it would only jiggle if it was moved and the faster it moves the more it jiggles and the longer it takes to rest.
Saturday, 16 October 2010
sb_final_01

This is the 1st frame of the story. It doesn't have to be too detailed as its just a general time line and planning for the major poses.
boris the bullet dodger
boris the bullet dodger, originally uploaded by James D Thompson.
Not too good at drawing but this will help me get a sense of the timings and some good poses to set out from the beginning :)
Because he dodges bullets, Avi
Because he dodges bullets, Avi, originally uploaded by James D Thompson.
Decided to change to this clip as there's not so much moving around so i can concentrate on the facial animation :D
Tuesday, 12 October 2010
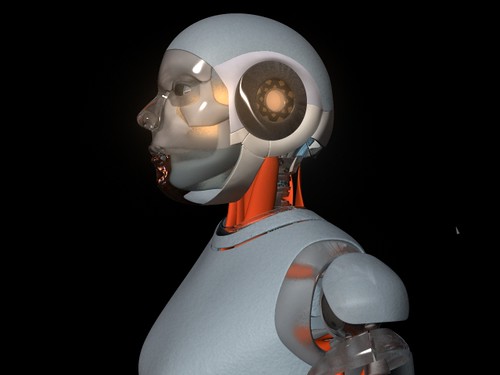
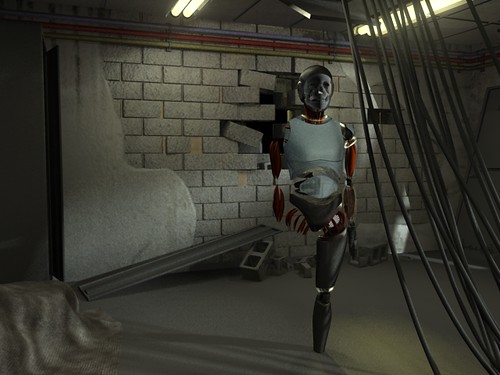
What am i - WIP - 40
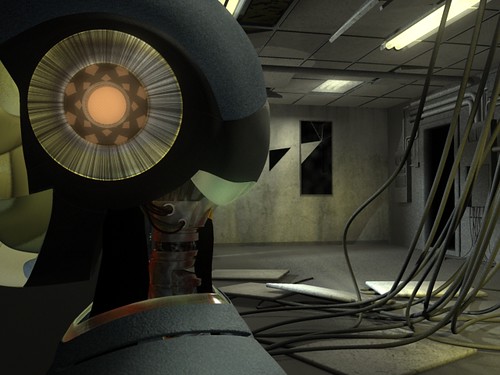
I decided to do another reference render test to see how the new shader's react to the room. As you can see the ear material has been blown out so some adjustments to that are needed but overall I'm quite pleased with the glass and neck metal materials. For this project the rendering is quite heavy so ill be exploring techniques like flooding the room with GI and FG photons and saving them out as a map. Also after a block of animation is done ill be rendering it out whilst I start on the next, then if all else fails I will reduce the scene to simple materials :D.
What am i - WIP - 39

Here I've made some more materials for the neck and other small parts what wont need textures apart from maya procedurals. The muscles need some more improvement but the muscle so far are lowers for rigging, then ill be duplicating them to give a hi-res version for rendering (this is because if i used the hi-res for rigging it would create a ton of lag in the Cmuscle systems).
Sunday, 10 October 2010
What am i - WIP - 38
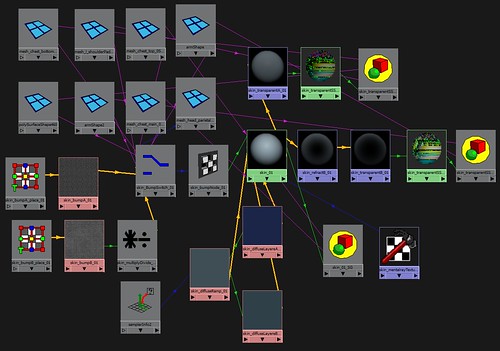
Here is the shading network for the robots skin with a few procedural textures that will be replaced by my textures made in either mudbox or just Photoshop. All the skin is similar so they all run through the same SSS skin node, then they are passed through some transparency and refractive nodes to give some surface shaders that use the same network but look different (e.g. there the same but one is more transparent and has refractions). Also as the meshes are different sizes and have different uv scales, using one bump made one mesh relay detailed whereas others were relay blown out and blotchy. To solve this i ran the bump through a switch node that assigns different sized bump textures to there relevant meshes. Overall this way im only using 1 SSS shader whereas with no network id be using at-least about 8 different SSS which laggs when rendering. This might seem over complicated just to save 5 second render time, but over the whole animation it will save a lot of time indeed :D
What am i - WIP - 37
I've started to build up some shader networks to get a feel of what textures are needed and what can be down inside maya with nodes. So far I've got some shaders how I want them to look, ill just have to create and plug-in some diffuse, specular, bump and transparency map's. Don't worry that the face looks funky i haven't done that bit yet :D
Saturday, 9 October 2010
What am i - WIP - 36
Signing off... By signing off I don't mean off face book so someone comes along and spam's comments :D, I mean sign off from one stage before you start the next so everything is completely done. Here I'm starting to finalise the UV's so that when I'm rigging I don't need to go back, create uv's, delete history then re-bind to the rig. Also before this I made sure i finished modelling them completely, so later on I don't decide to add some more detail and then find all my uvs are screwed up. This helps save a lot of time and also in a Group environment where everyone has there own job, trying to ask the animator to send the model back because you forgot to set-up the uv's before sending to model to the rigger will wast even more time and piss people off :S
The shot above is several separate meshes of the head's outer shell. I've set out the uv's together as there going to be rendered using the same shader, another way of doing this could be to let each piece have its own texture then have a switch in the hyper-shade that assigns the relevant textures to there mesh which is what ill be doing for more smaller parts of the robot.
Thursday, 7 October 2010
Tuesday, 5 October 2010
D-Fly - WIP - 04

Did a test render for the transparency on the wings, for the rest of the body I might be texture painting it in mudbox :)
D-Fly - WIP - 01
Decided to make another character as i was a bit bored lol. this kinds reminds me of spore :D. I decided to make a cartoon style dragon fly but crossed with a Damselfly as there eye's are bigger and stick out. Ill post some of my concept sketches when ive scanned em :)
What am i - WIP - 35
Just testing around with some shading networks to get some sort of Sub surface scatter with refractions and transparency depending on the facing ratio of the render cam, so when a surface is facing more toward the camera it become more transparent like the fresnel effect. Ive just referenced the two scene file together to get a idea of the render-time so far and double check the scale of the two scenes are consistent. This render only uses global illumination and no final gather as final gather only adds a little over the top of the GI but its not worth the extra render time.
Sunday, 3 October 2010
Barry - WIP - 08
Here ive started to modify the mouth a bit more. As the mouth needs more resolution there were several edge loops needed, so to avoid these loops spilling into the rest of his mesh where there not needed I looped them back. This way I am able to keep the resolution in one area. Main thin to watch out for it triangle as they don't help with the topology, N-gons (more the 4 sides) and poles (vertex with more than 4 edges) but you will eventually have to have a few N-gons and Poles, the trick is having them in areas that wont be deformed as much.
Saturday, 2 October 2010
What am I? Tutorials and pod-casts
In addition to these tutorials I will be recording some pod-casts filmed during the production to help newcomers to 3d understand the processe involved. Ill discuses things like preparation for a short animation with things like finding referances and making story board. Then when we start modelling id explain things like topology and how we can create clean models, different approaches to animating from pose to pose and straight ahead. Also I'm sure there will be some more tutorials on new things I find along the way :)
Tuesday, 28 September 2010
More than one way to rig a cat
What I mean by this is if your animation is only going to be about 30 seconds and the camera is mainly looking at there face then those 15 hours adding IK/FK to every finger toe might seem a bit wasted. Also think about if you're likely to be using this character again soon as spending 15 adding a good foot role will be easier than trying to add it later when you have to dig up all the hidden nodes and controls.
Then the most important part to remember is naming conventions. Not only will it make your rig look neat and tidy, it will safe a heck of a lot of time. For example if you name every joint that is going to be used to bind to the skin, if you use a prefix of something like bn (short for bind), when it comes to skinning you can simply use maya's search tool to select all objects with a prefix of bn. That might seem small but if your making quite a complex character being able to search and select a large group of similar objects is essential.
Another naming convention to keep in mind is where it is on the rig, if its joints for the leg, name them with the correct term like knee of ankle, this is also essential if the rig is intended to be used by someone else. Other good practices are using _l_ or _r_ for left and right, this way if your rig is symmetrical, you can make some side and quickly mirror it across making maya change the _l_ to _r_ and save yourself from any tedious renaming.
Whilst making/rigging my character for "what am i" there are a lot of muscles involved, so everything that's involved in the muscle system was given a prefix of mus. Also any joint that are used to bind to the face were given a prefix of bn_face, this way i can quickly select binding joints of a specific area of the rig. Then always remember to add a number at the end (e.g. bn_l_wrist01) as later down the line you may need to add a similar joint and there will be a naming clash, this was essential for me as when i made the muscle i decided half way through that id add some more, so i was able to use the same naming convention and just change the 01 at the end to 02.
Saturday, 25 September 2010
Barry - WIP - 07
All hail the Hypnosnail... I've set out the UV's for the snail so I can start on some textures. The whole main body is one mesh so I've made the seam along the back where most of it is covered by his shell. When rendering I will be smoothing the mesh so its best to set out the UV's now where there's not so much resolution to deal with. Another tip is if you're working on a large scene and you're setting the uvs of multiple objects instead of assigning a checker texture and then re-assigning there shaders after make a render layer with the surface shader as an override, this way you can set the uv's with everything using the surface shader, then when you're done delete the render layer to get back to normal with there own shares still assigned.
Friday, 24 September 2010
Barry - WIP - 06
Made some more adjustments to the mouth and redo the topology for the upper body for better deformation when it comes to animating. To start off with the chest and arms were connected like a grid which looks good, but doesn't deform well as there would be a lot of twisting so i re directed the edges so it loops around the elbow joint. Ive also added a few procedural textures for the shell and added some small nostrils :D
Thursday, 23 September 2010
Barry - WIP - 05
Here I've added some volume to his arms and rotated the hands so there in the correct position for rigging. I've also started making his mouth. From looking at cartoon mouth references it seems the majority don't have much detail and keep a simple smooth edge so I've decided to try go for this look.
Barry - WIP - 03
I made the hands by starting with a cylinder then attaching it to he body and with a fed tweaks to give a hint of some muscles.
Barry - WIP - 01

The start of a new Character "Barry the snail". Started off be extruding along a spiral curve to get the shell and a cylinder for the body.
Tuesday, 21 September 2010
In Bruges - Lollipop Man
Old projects cannibalised by mutants
All hope seemed lost for the neglected street scene with its simple UV's and un-clean topology. However when I started my individual project I thought to myself, wouldn't it be good to have some sort of street scene to start off with, something that wouldn't take too long to make (as its not a main part of the story). Then suddenly that old neglected scene file was lifted from the depth of removable HDD hell, given hope and injected with the power of Maya 2001 from Maya 6. Then with a few minor improvements I was able to cannibalise this old withered husk of a street scene and strategically save 2 hours :)
This may seem pointless as 2 hours isn't that significant when spending months on a project however recycling several props and keeping a small library of primitive objects can end up saving you a ton of precious time on tight deadline projects. This might seem like cheating and avoiding learning new things but after you've made 5 different ears there's not much you will learn from making a 6th. Keeping a primitive ear you can easily incorporate into you're next new character and modify will give you more time to spend elsewhere making something new or better.
So next time you make something that doesn't work out, think how it can be used in other projects, and when making several characters, instead of making 6 head from scratch, make 1 low-res simple head and re-use it for other characters and projects.
Outside the box can lead to another box :D
So I've decided to look into doing a clip with cartoon snails as the characters so that at the end I will have the character finished and rigged for another project. Ill also be able to explore ideas like how can I portray human facial expressions and body language onto a different forum as this will be good practice as the majority of animated films have at-least one or more non-human character.
Also the most important thing to remember is to try new things and expand you're skills, if you've rigged a face before, try rigging a face that's completely different, if you've animated a character, animate a character with a different personality. It's very easy to get stuck in a rut making similar characters, making similar rigs and using that same personality when animating, still coming out with a good piece of animation but not learning as much as you could and making something better the next time.
Wednesday, 15 September 2010
Hey Paul!!!
Hey Paul!!!, originally uploaded by James D Thompson.
This is the scene I will be using and trying to recreate for my facial animation class. I chose this because there's a lot of non verbal communication with his hands that help emphasise his dialogue and actions :)
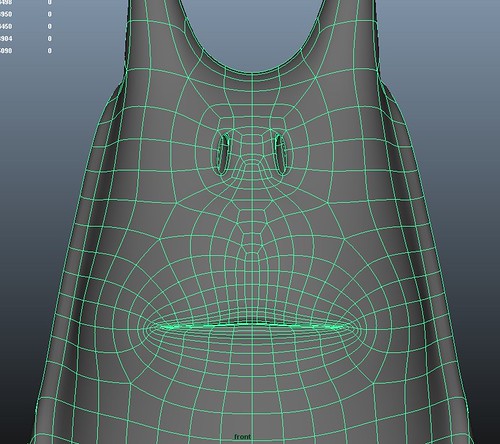
Hey Paul! - WIP - 01
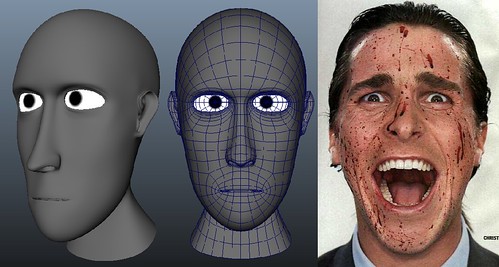
Starting to make a head for my facial animation. I've decided to do a clip form "American Psycho" as not only is there some good dialogue but also some fun mad expressions :D. The head above isn't supposed to look like Christian as im making a full simple character and rig to do a few animations with. So far I've got most on the topology how i want so now i cam make some major changes easily.
Monday, 13 September 2010
What am i - WIP - 34
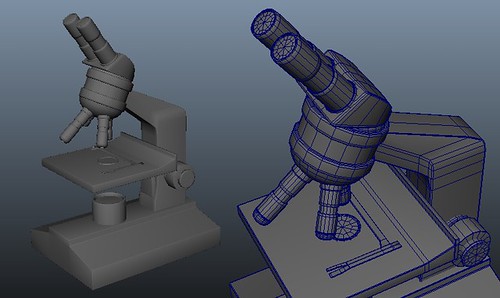
Starting making and updating detailed props to populate the scene. I made this microscope for my last animation but it was just made up of polygon primitives and simple shaders with no textures. Here I have cleaned up the old model and set up all the uv's in one tile so i can save on texture space and only use one shader. As this prop is quite small and never seen close up ive reduced the overall resolution to reduce on render time.
Monday, 6 September 2010
What am i - WIP - 33

i decided to add a bit more detail to one of the walls by replacing it with some breeze blocks that have been damaged. as i start to tweak the lighting a bit more ill be making it darker but with some added light seeping through the broken wall to add more space to the scene like theres something on the other side. Also im not too sure about the scale as they seem a bit too big. When im more happy ill brake a few blocks on the wall and add some rubble on the floor to give a greater strength of decay.
Thursday, 2 September 2010
What am i - WIP - 32
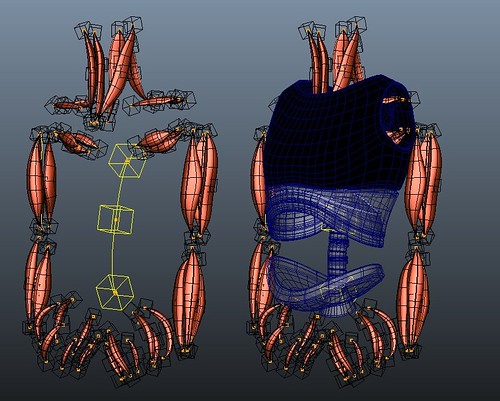
Body building my muscles :D. this is a shot so far of the muscles for the upper body. These muscles will be used for rigging and rendering so they have to fit well with the rest of the robots mesh. At the moment i'm undecided but i can either use the muscle skinning tools to give realistic skinning for the muscles against the mesh or use normal smooth skin and just add the nurbs muscle as influences. I have also use a muscle for the spine mesh which gives good deformation with little effort. The next step will be to set the "stretch", "rest" and "squash" states of all the muscles.
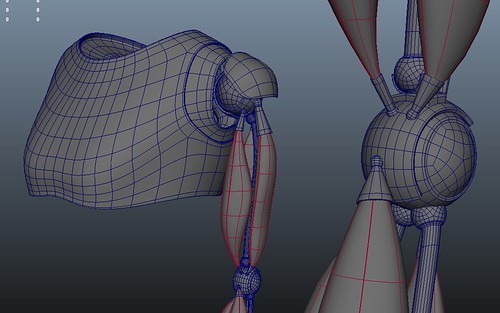
What am i - WIP - 31
Here ive made the muscles for the arm's, ive tried to model close to the real thing as there not just rigging muscles they will be rendered as well. For the elbow joint instead of having one joint to rotate around ive made one main and a 2nd smaller joint. this way there is a small offset which helps rotate the muscles more and get better displacement with the muscles.
What am i - WIP - 30
Ive started to make more complex things like the main spine to bring the main part of the body together. For the robots mesh, i molded most of it to get a good low-res base, then ive started to add more detail as ive got a better idea where all the pieces fit together.
Monday, 16 August 2010
What am i - WIP - 29
Instead of adding resolution to simple objects to give a smooth look ive decided to use the round corner node. The round corner node acts as a normal trick, so the hard edges on the mesh to the right are smoothed when its rendered to give the result on the left. Ive plugged it into the mia_material_x standard bump which leaves the overall bump to be connected to a texture for the rusty metal look.
Saturday, 14 August 2010
What am i - WIP - 28

I wanted to add some cloth to the scene so instead of modeling some cloth by hand i used the Ncloth system. By using nCloth i made a polygon plane into cloth and had it fall and wrap around some cubes to give the look its covering some crates or something. then i deleted the history and Ncloth systems to give the final mesh, this also helped because it started off as a plane, the uv's are already perfectly set out :D
Thursday, 12 August 2010
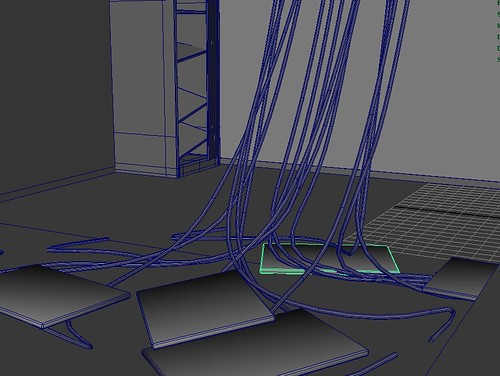
What am i - WIP - 27
Modeling with hair. I wanted some broken wires to spill out from a hole in the ceiling, this sounds easy to make but it would involve making a nurb's curve, extruding along it to make a tube/wire, then adjusting the curve and making more wires but to do this 30 times and try and get a realistic look can be quite hard and tedious. So instead i created some maya Nurbs curve hair, made it collide with the room and played the simulation through so that the nurbs curves would fall with gravity and collide with the different parts of the room and give a realistic drooping look, then when all was done i extruded along the curves and deleted the hair system so i was just left with some nurbs tubes for my wires :), by doing this i was able to make them in about 8 min :D