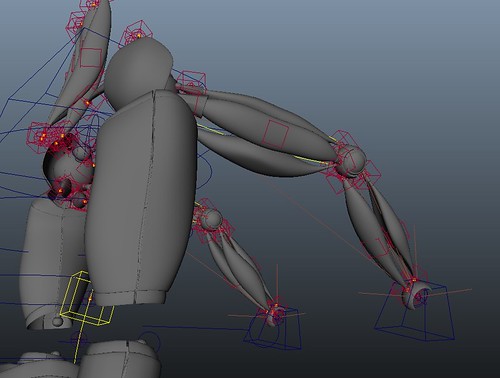
What you can see here is the muscles rigged :D, now all I need to do is skin the mesh to the muscles to get them to follow along. But... to my horror, when I started to bind the mesh through muscle skinning it didn't work!!! :0, the reason was some connections had broken on the left arm and I was unable to get the muscles to influence the mesh. To solve this though I was able to import the muscles from a previous save where they were still working :D. So now I've got them working its off to rigging the rest :)
Saturday, 30 October 2010
Wednesday, 27 October 2010
Maya tips - Hypershade
Hi, in this tutorial i go through some methods of using the hypershade and its uses for creating shaders or for rigging.
Tuesday, 26 October 2010
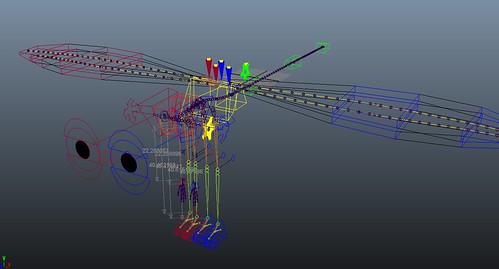
D-Fly - WIP - 13
This is the same rig as the last WIP shot with all the extra bits hidden, the remaining controls are the ones that will be animated :). To hide the rest of the rig, all the parts that are going to be hidden are placed in a group called "parts to hide" this way as there all in one group i can set the groups visibility to 0 to hide them all, then if I need to modify the rig I can simply set the visibility to 1 to show them all. This will save a lot of time as if I had just set the visibility to 0 on each object, if I wanted to edit the rig id have to find all the objects and make them visible which would take some time. I have also used groups for objects like all the IK handles, control curves and joints. By doing this its easy to keep track of the rig and what parts can move and what parts keep still to avoid double transformations. This is helpful as if they were just in one big group, scaling this group would scale the control curves, the the muscles so it would blow out of proportion. Also if i do scale the group, its connected to the node based stretch arms and legs, this is because a stretch rig depends on the distance of the arms and if the rig is scaled, the stretchy rig wont work as it still thinks the arms are the old length. to avoid this the groups scale acts as a multiplier for the stretch rig, meaning if i scale the rig, it also updated the stretchy distance values.
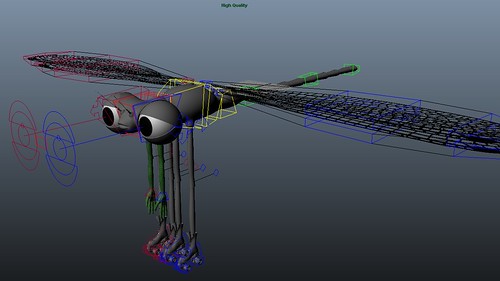
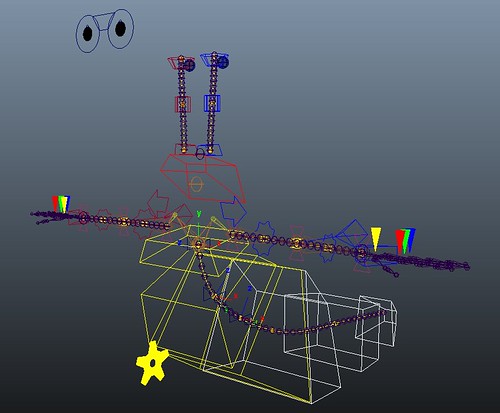
D-Fly - WIP - 12
This is just a screen shot of the whole rig and all its working bits but most of it is stuff the works behind the scenes and will be hidden so only the animation controls will be seen when animating to make like simple :D
Saturday, 23 October 2010
D-Fly - WIP - 10
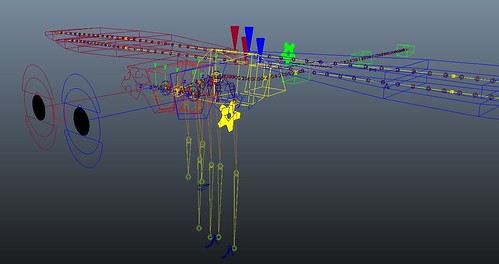
This is a shot of my rig so far not including the facial legs or arms yet. There are a lot of things going on but most of it is behind the scene and will be hidden when the rig is finished and ready for animation, so when animating its easy to see what controls are needed :D. There are quite a few long chains of joints but this it to keep a good resolution of deformation if the limbs are stretched :D
D-Fly - WIP - 09
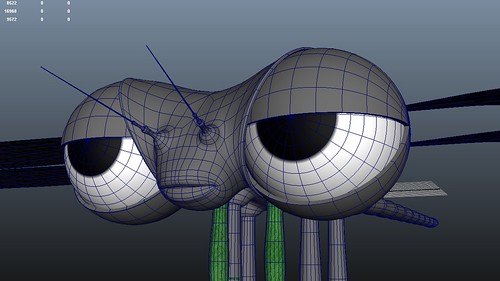
All work and no play make dragon fly tired. The eyes for this were quite interesting. The eye and its lids are kept solid but thy can droop independent from the head similar to the snails antennas which allows for some extra emotion.
For the shot above is just rotated the head slightly forward which makes him look more tired or more angry, by rotating the head back he appears more nervous and scared. So even with the same facial expressions the position of the head can add subtle emotions that will re-enforce any expressions added. So when animating for facial animation don't forget the head :D
D-Fly - WIP - 08
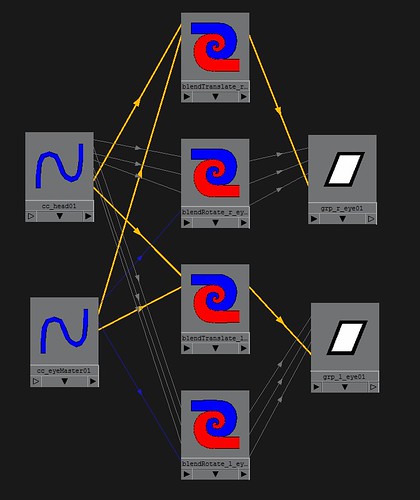
I love node based rigging :D. Here is how ive rigged the "Follow" attribute of the eye controls so they can either follow a master control so the eyes can follow an object, or they can follow the head, so the eye's stay fixed with the heads movements.
I first used some parent constraints but the popped when I changed the weigh if i wanted the eyes to stop following, so using nodes I was able to blend the two parent objects without using constraints. This way a blend of 0.5 means 1/2 of the position is coming from the head and the other 1/2 is where the master eye control is, this means I can smoothly blend between 2 controls and avoid any annoying popping.
In the long run this means i can avoid any extra counter animation if i want the eyes to follow different thing then his head, without this id have to tweak about with key's trying to hide when the eyes pop.
Thursday, 21 October 2010
rig like an Egyptian...
rig like an Egyptian..., originally uploaded by James D Thompson.
just doing a teat combining the stretch bend and jiggle parts of the rig working together, here ive only animated 3 controls for the arm and the COG (centre of gravity) of the body.
So far the stretch has no control over the volume of the arm so it doesn't shrink as you stretch it but ill try fix that soon :D.
D-Fly - WIP - 07

Ive started to texture some parts of the dragonfly :D. so far im keeping texturing a low priority as ive set up the uv's so im able to apply the textures after rigging with no need to add any history. I like the look of the scales on his arms but i might modify the textures so there a bit more cartoon style almost vectors, then maybe even render in mentalray with a cell shading feel.
D-Fly - WIP - 06

Here i have started rigging :D. Ive started rigging this before i finish the snail as im wanted to to both stages of the rigs at the same time so im doing the muscles and rig for both one week, then the paint weights the same time the next week.
When rigging my preferred approach is to sketch some plans of how things might work, then create the control curves first. This way i know all the controls i need and what constrains they have instead of adding more controls at the end and finding out i have to delete and re-constrain things to get the new controls to work.
Other things I've added are simple 2 point nurbs curves with clusters at either end so i know what controls are attached to whet e.g. the eye controls have one end of the line attached to the eye control and the other to the actual eye it controls. This way when animating i can easily see what controls do what and where a control might be hidden.
D-Fly - WIP - 05

I was stuck on what type of shoes or feet he might have but after brainstorming some ideas I came up with old skates :D.
I decided with these as the character is quite large but with long thin legs that make him look unbalanced and clumsy so to add to this he's now in 2 pairs of skates :D. Other animation ideas I might use this character for is some sort of stunt dragonfly that has to gain speed with the roller-skate before taking flight.
Wednesday, 20 October 2010
Barry - WIP - 10
This is the rig so far but don't worry, most of what you see here will be hidden and locked away never to be animated as there just there for rigging. The arm has several controls as it uses an IK/FK setup that drives the stretchy muscle rig but it will all be hidden only to show the actual controls that need to be animated.
Tuesday, 19 October 2010
Barry - WIP - 09

This is one of the stretch arms with no mel :D.
I have a measurement tool connected to the clavicle and wrist joints so I know the length of the arm.
So this is how maya reads it :)
1) The condition node asks, is the distance tool less than or equal to the arms default length with no stretch.
2) If true, the arm is either in its normal position or smaller, so we want no stretch as we want to bend wit Ik so the joints scale = 1.
3) If false (i.e. the animator has stretched the arm by moving the wrist too far) then the values for the joints scale comes from the multiply divide node.
4) The multiply/divide node takes the current length of the arm (the distance tool) and divides it by the length of the arm at default. So e.g. if the default length is 2, if there is no stretch the arm length will = 2, so there divided to = 1 and the joints scale is 1. if the arm is stretched to a length of 6, the its 6 / 2 = 3. This way the arm stretches as you want it to, without this the arm would scale + the defaults arm length, which leads to a huge pop when stretching and a massive offset which leaves the arm stretch useless. But with it it works :D
Also, if you reduce the "default arm size" this means you can shrink the arm before it bends with the IK
Jiggle test
Jiggle test, originally uploaded by James D Thompson.
This was just a jiggle test :D. im using muscles and splines for the whole rig. The arms contain about 20 joints (excluding the hand) but the can go into IK or FK, with full stretch and jiggle in both modes. There are a lot of joints as when the arm is stretched there needed for a good arc. The jiggle values can be keyed so he can have a solid stiff arm to complete jelly, the arms can also bend and twist like a Mexican wave whilst still jiggling and following either FK or IK :D.
I've done the same for the chest, tail and antennas. In the video I haven't edited any paint-weights ive just used the default setting.
Also, it might look quite complex, but when animating most of the controls you see are hidden as there only for rigging and wont ever be animated :D, you only need to animate the arm as normal, then edit the jiggle values if you want.
The jiggle is dynamic... so it depends on the speed of the movement e.g. if the jiggle was set to a jelly like state it would only jiggle if it was moved and the faster it moves the more it jiggles and the longer it takes to rest.
Saturday, 16 October 2010
sb_final_01

This is the 1st frame of the story. It doesn't have to be too detailed as its just a general time line and planning for the major poses.
boris the bullet dodger
boris the bullet dodger, originally uploaded by James D Thompson.
Not too good at drawing but this will help me get a sense of the timings and some good poses to set out from the beginning :)
Because he dodges bullets, Avi
Because he dodges bullets, Avi, originally uploaded by James D Thompson.
Decided to change to this clip as there's not so much moving around so i can concentrate on the facial animation :D
Tuesday, 12 October 2010
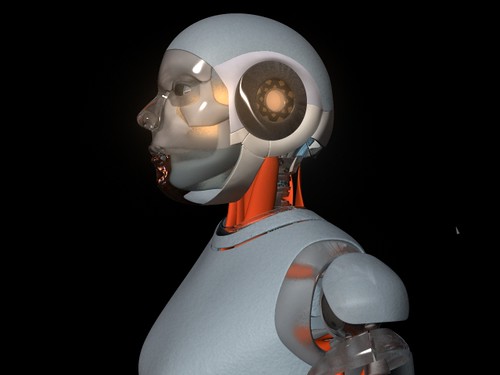
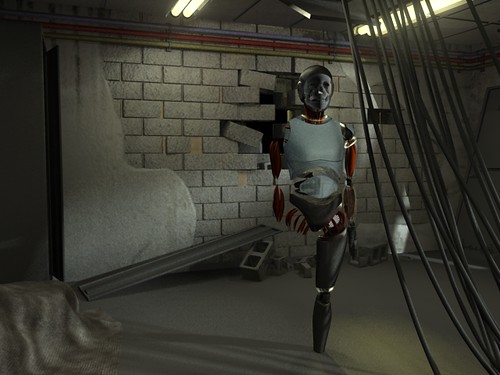
What am i - WIP - 40
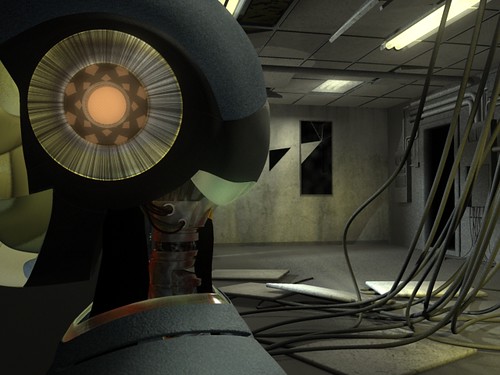
I decided to do another reference render test to see how the new shader's react to the room. As you can see the ear material has been blown out so some adjustments to that are needed but overall I'm quite pleased with the glass and neck metal materials. For this project the rendering is quite heavy so ill be exploring techniques like flooding the room with GI and FG photons and saving them out as a map. Also after a block of animation is done ill be rendering it out whilst I start on the next, then if all else fails I will reduce the scene to simple materials :D.
What am i - WIP - 39

Here I've made some more materials for the neck and other small parts what wont need textures apart from maya procedurals. The muscles need some more improvement but the muscle so far are lowers for rigging, then ill be duplicating them to give a hi-res version for rendering (this is because if i used the hi-res for rigging it would create a ton of lag in the Cmuscle systems).
Sunday, 10 October 2010
What am i - WIP - 38
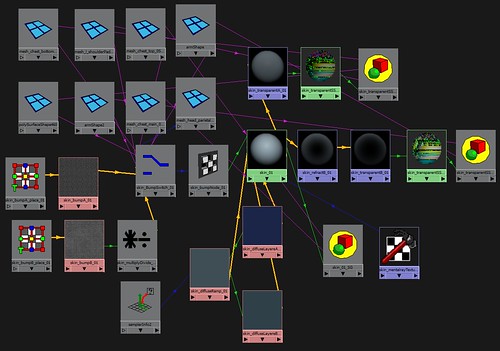
Here is the shading network for the robots skin with a few procedural textures that will be replaced by my textures made in either mudbox or just Photoshop. All the skin is similar so they all run through the same SSS skin node, then they are passed through some transparency and refractive nodes to give some surface shaders that use the same network but look different (e.g. there the same but one is more transparent and has refractions). Also as the meshes are different sizes and have different uv scales, using one bump made one mesh relay detailed whereas others were relay blown out and blotchy. To solve this i ran the bump through a switch node that assigns different sized bump textures to there relevant meshes. Overall this way im only using 1 SSS shader whereas with no network id be using at-least about 8 different SSS which laggs when rendering. This might seem over complicated just to save 5 second render time, but over the whole animation it will save a lot of time indeed :D
What am i - WIP - 37
I've started to build up some shader networks to get a feel of what textures are needed and what can be down inside maya with nodes. So far I've got some shaders how I want them to look, ill just have to create and plug-in some diffuse, specular, bump and transparency map's. Don't worry that the face looks funky i haven't done that bit yet :D
Saturday, 9 October 2010
What am i - WIP - 36
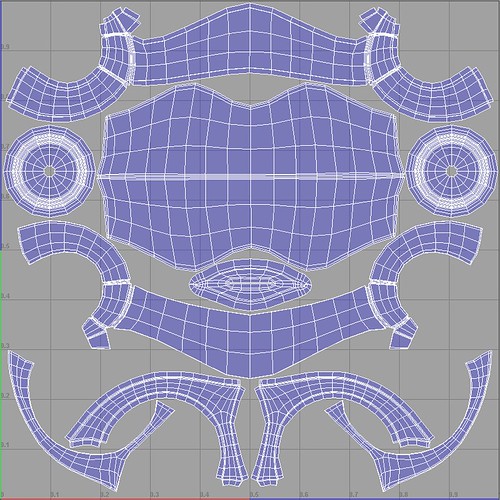
Signing off... By signing off I don't mean off face book so someone comes along and spam's comments :D, I mean sign off from one stage before you start the next so everything is completely done. Here I'm starting to finalise the UV's so that when I'm rigging I don't need to go back, create uv's, delete history then re-bind to the rig. Also before this I made sure i finished modelling them completely, so later on I don't decide to add some more detail and then find all my uvs are screwed up. This helps save a lot of time and also in a Group environment where everyone has there own job, trying to ask the animator to send the model back because you forgot to set-up the uv's before sending to model to the rigger will wast even more time and piss people off :S
The shot above is several separate meshes of the head's outer shell. I've set out the uv's together as there going to be rendered using the same shader, another way of doing this could be to let each piece have its own texture then have a switch in the hyper-shade that assigns the relevant textures to there mesh which is what ill be doing for more smaller parts of the robot.
Thursday, 7 October 2010
Tuesday, 5 October 2010
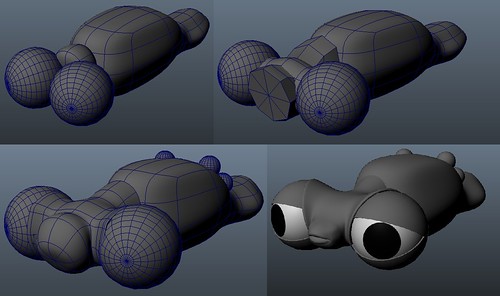
D-Fly - WIP - 04

Did a test render for the transparency on the wings, for the rest of the body I might be texture painting it in mudbox :)
D-Fly - WIP - 01
Decided to make another character as i was a bit bored lol. this kinds reminds me of spore :D. I decided to make a cartoon style dragon fly but crossed with a Damselfly as there eye's are bigger and stick out. Ill post some of my concept sketches when ive scanned em :)
What am i - WIP - 35
Just testing around with some shading networks to get some sort of Sub surface scatter with refractions and transparency depending on the facing ratio of the render cam, so when a surface is facing more toward the camera it become more transparent like the fresnel effect. Ive just referenced the two scene file together to get a idea of the render-time so far and double check the scale of the two scenes are consistent. This render only uses global illumination and no final gather as final gather only adds a little over the top of the GI but its not worth the extra render time.
Sunday, 3 October 2010
Barry - WIP - 08
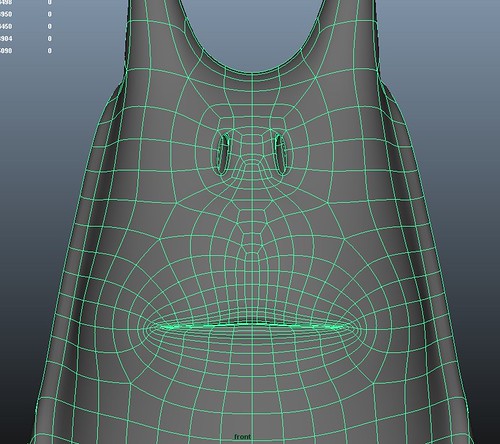
Here ive started to modify the mouth a bit more. As the mouth needs more resolution there were several edge loops needed, so to avoid these loops spilling into the rest of his mesh where there not needed I looped them back. This way I am able to keep the resolution in one area. Main thin to watch out for it triangle as they don't help with the topology, N-gons (more the 4 sides) and poles (vertex with more than 4 edges) but you will eventually have to have a few N-gons and Poles, the trick is having them in areas that wont be deformed as much.
Saturday, 2 October 2010
What am I? Tutorials and pod-casts
As im making my project "what am i?" i will be creating videos on little tips you can use in you're own work. I will be doing a few tutorials on the new features of Maya 2011 including the new interactive skin bind :)
In addition to these tutorials I will be recording some pod-casts filmed during the production to help newcomers to 3d understand the processe involved. Ill discuses things like preparation for a short animation with things like finding referances and making story board. Then when we start modelling id explain things like topology and how we can create clean models, different approaches to animating from pose to pose and straight ahead. Also I'm sure there will be some more tutorials on new things I find along the way :)
In addition to these tutorials I will be recording some pod-casts filmed during the production to help newcomers to 3d understand the processe involved. Ill discuses things like preparation for a short animation with things like finding referances and making story board. Then when we start modelling id explain things like topology and how we can create clean models, different approaches to animating from pose to pose and straight ahead. Also I'm sure there will be some more tutorials on new things I find along the way :)
Subscribe to:
Posts (Atom)