Via Flickr:
Early mesh test.
When creating this script i was also making a skeleton mesh. I was going to create a few more like a horse and bat but i decided not to so more time could be spent scripting.
However that didn't stop a few ideas floating around.
The main idea was that if its possible to blend between different limbs with Homology, then why couldn't this be adapted to the mesh aswell?
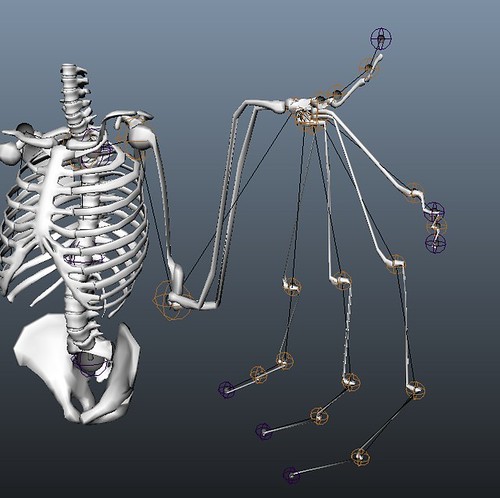
This early screenshot shows the human mesh being hooked to a human arm pre-rig, then blending to a bats wing. Obviously this will need more work (joints don't rotate) but you can see how quickly its get a new bone mesh with little effort.
With more time this could hopefully mean as you rig you also get a custom bone mesh. This might seem cool but quite useless as the bones are inside a character so never rendered. However these low-poly bones are designed for muscle skinning or any n-mesh skinning. Meaning that the end result could be used to drive maya c-mucles skinning.
This also ventures into the idea that if this is possible, then this could be used with a base mesh of a character, that way a low poly base mesh can be quickly created to aid in sculpting or quick reference for animation.
This could also reverse the was a character mesh is made. In traditional sculpting you would create a inner wire-frame with metal wires and start to build over them with clay, so your essentially making a simple skeleton and bulking the muscles ans skin on top. This workes well as your building a character on its bone structure, however in digital character creation we usually make a mesh and add the bones for rigging after... why? does it have to be done this way?
When you make a character you always pay attention to how it will animate/where the joints are but before there actually there. So wouldn't it be easier to get the skeleton in there so the sculptor knows exactly where things need to be instead of using 2D reference for the joints positions??
More research will be put into this but essentially, why cant we create a pre-rig of a character and mesh, so then this base mesh can be used for the sculpting of the character which is then already matched to its joints so that all its bones, muscles and rig can be procedurally built around the bone structure
Saturday, 24 November 2012
HR - WIP - 045
Thursday, 6 September 2012
Wednesday, 5 September 2012
HR - WIP - 045
Via Flickr:
Woooo, everything is almost finished, just uploading all the WIP images ive not have chance to upload yet.
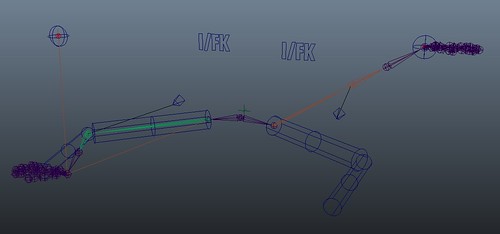
This is the "LongLimbIK". This is basically a more complex IK system for Limbs that don't end at the wrist.
Animals like dogs and horses don't have the ankle on the floor, its raised up to make a second bend in the leg, so using a normal IK would make the animation hard as the control wouldn't rest on the ground.
This uses a IK spring solver, which maya doesn't enable by default. The spring handles multiple bends better but this system doesn't stop there.
The leg is duplicated and a normal IKRP is applied to the last bend, and parented to the spring IK, this means the animator can now move the IK which rotate both bends correctly but also there's a pitch and twist attribute.
The pitch attribute allows the animator to place the ik anywhere, then have the limb rotate from the hip but still keeping its foot in the same place.
This is a massive advantage as this allows for a lot of control.
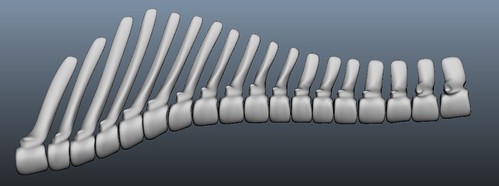
HR - WIP - 044
Via Flickr:
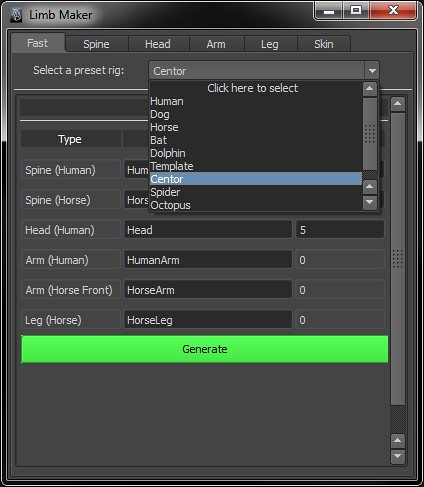
This is a line of all the full pre-sets. From left to right:
Human, Dog, Horse, Bat, Dolphin, Template, Centaur, Spider, Octopus and Hexapod.
When creating these you can specify custom names and joint counts for the spine and neck. Also this process is undo-able.
As so many limbs get made at the same time, a loading bar pops up to show how far its is through generating the character. It takes no longer that 10 seconds to generate one but the progress bas is there just to reassure the user maya hasn't crashed and its just working.
These pre-sets are fully integrated with the other tabs, so the user can still edit them or even add more limbs if they want.
HR - WIP - 043

Via Flickr:
Now with Preset spider
Although this script doesn't quite cover insects (as they have extra joints for the legs) They will be supported later on so just to show how quick it can make different rigs ive added in a few pre-sets like spiders centaurs and octopuses.
Also, the user can use the fast tab to create the main pre-sets of human, dog, horse, bat and dolphin but the cool thing is that if we add some sliders that connect to all the limbs, its possible to blend from a full human rig to full horse rig ect...
HR - WIP - 042
Via Flickr:
Getting close to the deadline so im adding as many areas as possible as asked for in the user feedback.
This is the new first tab which is the fast rig. As everything is procedural this tab just generates a tab and rig to the most used characters.
This also means the new character is fully integrated with the other tabs, so you can still edit, delete or add new limbs.
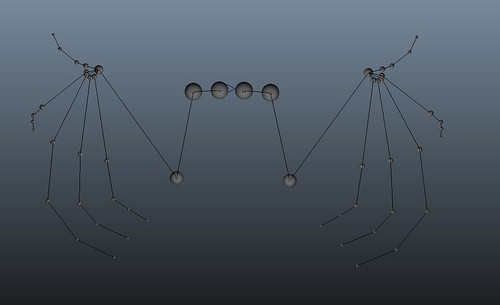
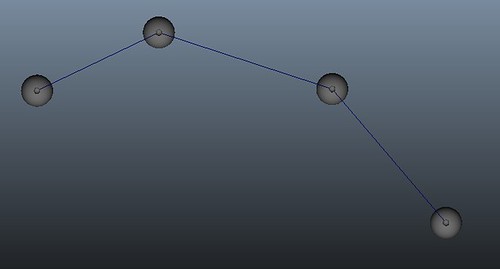
Leg_blending001
Leg_blending001, originally uploaded by James D Thompson.
Via Flickr:
Its also possible to key frame the sliders in the UI,
This just shows how the leg limbs blend seamlessly between the different species.
Thursday, 23 August 2012
HR - WIP - 036
Via Flickr:
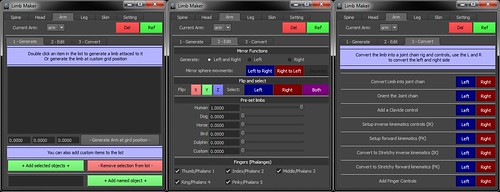
Quite happy with the final look of the tabs, think this will be the final look with a few possible changes.
This shows the generate, edit and convert tabs of the arm limb but the same exact layout is used for the legs (as they load from the same procedure).
The Spine and Head have the same generate tab but the edit and convert are slightly different but basically the same so its quick for the user to pick up.
Ive also added a refresh button which when clicked refreshes the entire GUI without deleting and re-opening it. This is if users press Undo, so for example if the user converts there limb to joints the convert button gets locked and turns green to show its been used and can't be used again. However if the user presses Undo, the limb is no longer converted to joints, so by clicking the refresh the GUI examine what's in the scene and reset the buttons to match, so the user can press undo if they have done something wrong and the buttons will refresh aswell.
I have made a script job that does the same thing. A script job is a script executed every time a trigger is activated, so for example i could have it so the GUI buttons refresh every time the user presses Undo which has a real time affect so the user has no need to click a button. However this has the effect of reducing the Undo list to 1, so its limits how many things can be undone so for that reason im sticking with a button for the moment.
Ive added a skinning tab which i might add some more skinning functions to and an edit tab which will contain some global setting and options.
Wednesday, 22 August 2012
HR - WIP - 035
Via Flickr:
More fine tuning,
Now the head and spine both run on the same procedures except when there run with a variable set to "Head" instead of "Spine" it adds the head parts on top.
This is because basically the neck is a small spine section, so why bother making procedures to make and convert, add ik and fk to a neck when the spine procedures already exist.
This also have the huge advantage as the user can choose the amount of joints in the neck, which will help for unusual creatures that have long necks such as giraffes.
Tuesday, 21 August 2012
HR - WIP - 034
Via Flickr:
Yo dog, we heard you were rigging a dog...
Huge update since last as iv gone over the whole script making it as efficient as possible.
No every limb is made from the same procedure (including the head), this is done by making a procedure that makes a sphere control and parents it to the previous sphere control so ultimately its quite like the joint tool.
I've also made the tabs procedural so all the "Generate" tabs are from the same procedure, all the "Edit" tabs are from the same ect... Also the Main tabs "Spine" "Arm" "Leg" "head" all come from the same procedure.
So in the end 16 different tabs all come from 2 procedures but there totally custom to the limb there making.
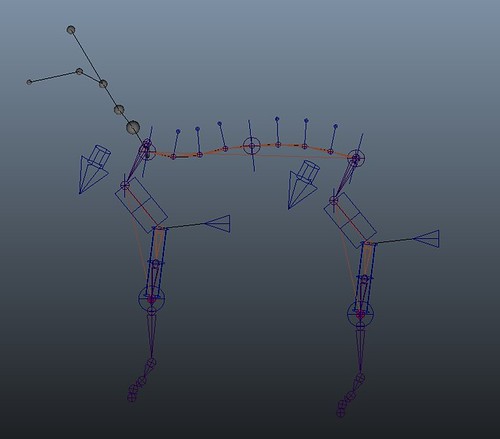
This picture shows how a quadruped might look like at the end. This was 100% made through the GUI of the script so it can give you an idea of what can be made, and this only took about 2 minuets to generate :D.
Other update are the clavicle controls, automatic pole-vector and improved naming conventions.
What I might add at the end is a quick build tab where the user can specify the more common used animals such as Human horse bat and dog, which will then build the entire animal in pre-rig move (so the user can move it to fit the mesh) then convert the entire thing so its only 2 steps for the more common animals.
You may notice that the clavicle controls are pointing down, this is because there parented under a group that's rotated to match the joint they control, this means the clavicle control's rotation and the joints rotation match, which means the rotate perfectly with no nasty offset.
The back legs on this also have clavicle controls but its optional so you don't have to have them (as there isn't a clavicle in the hip) but ive left the option in as this can be used for some strange creatures that might have a clavicle (To get things like hexapods working) also it allows a little more freedom for the animator to get better poses.
Thursday, 16 August 2012
HR - WIP - 033
Via Flickr:
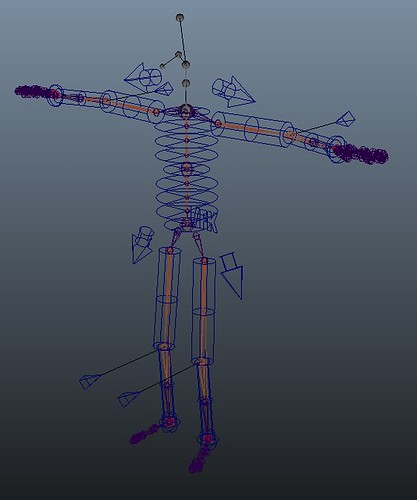
First look at a full working procedural rig :D.
This uses the default human pre-sets with stretchy IK and FK on all limbs.
Later on I think ill add a quick generate button where the user can bulk generate, e.g. human will run all the limbs to make a pre-set human and horse will make a horse for users that want a quick rig and don't need to edit the rig much.
Tuesday, 14 August 2012
HR - WIP - 032
Via Flickr:
This picture is just the spine with FK controls.
Here there are 3 main controls and individual controls for each joint.
Each control is parented in a hierarchy and then to the Main control below it.
The animator wont usually need this many so the individual controls can be hidden as for most cases the large start mid and end controls will do but for any FK rig its important to be able to have the option to tweak all the joints.
HR - WIP - 031

Via Flickr:
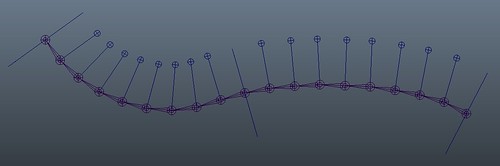
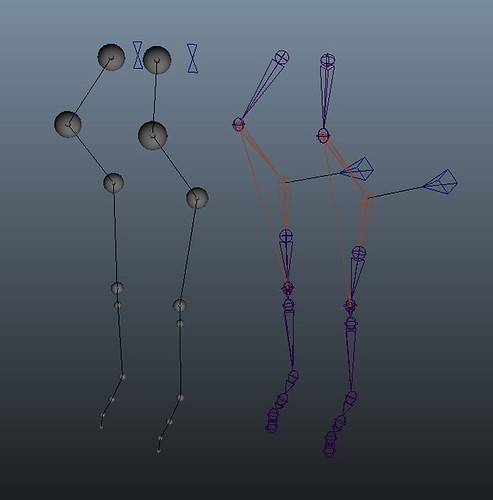
More spines!
From left to right is how the spine is made
Left: The user enters a name and joint count and a pre-rig is made which the user can move around to fit there character. Although its just 3 controls to move the curve is very smooth (depending on the joint count the user entered)
Middle: The pre-rig is converted to two joint chains, one that is a joint chain from start to end, the other is separate joints point constrained to the last chain.
This way the 1st chain or joint driver, moves the 2nd set of joints, this allows the rotation to be hooked to something else later for better spine twisting.
The main problem with IKSplines is that there is no Twist (well there is a twist attribute but its functionality is very limited). So the idea for this to have the spines "Twist" driven by the rotation of the 3 controls.
This has been quite fun to get working because the aim was to get just a pre-set 5 joint spine working but not its possible to get 10000+ joint spine if you think you're Maya could handle it :).
HR - WIP - 030
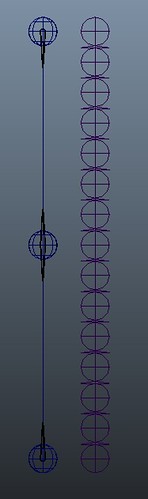
Via Flickr:
This is what the spine set-up sphere controls look like. (the joint have been moved for the pic but they lay on-top normally).
This is the same as the other limbs where you are given a "Pseudo" rig to work with that is converted to a rig after your happy.
This has 3 spheres with little tangent spheres in the middle to show the direction of the curve. Unlike other limbs, the user is asked how many joint the want in there spine, then the "Pseudo" curve has the same amount of cv's.
Moving the spheres moves the curve via a smooth skin so the curve eases in and out of the controls for better smooth spine placement.
After the user is happy the curve is converted to joints, to do this it needs to know how many CV's there are on the curve so:
curve.degree + curve.spans = cv count
Now we can run a loop that xforms the position of each cv and makes a joint chain on them.
Now we have a clean joint chain to make a spine from :).
HR - WIP - 029

Via Flickr:
For most limbs an normal IK will do but for limbs like dog's and horses they have to work a little different.
This is because in human arms/legs the IK would end at the writs/ankle but as the done structure is different in some other animals the IK needs to finish at the Metacarpals.
This is because those animals look like they have a "backwards knee" but intact that's actually there wrist joint and its the Metacarpals that are on the ground.
To make this work a different IK set-up is needed, so for this im using the spring IK. This ik is quite similar but it handles more that one bend better (e.g. the knee and wrist).
Thursday, 9 August 2012
HR - WIP - 028
Via Flickr:
Wooooo,
Got another bit working better.
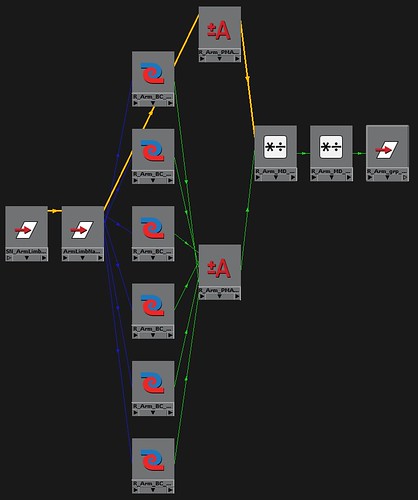
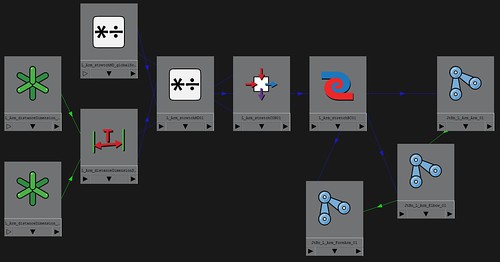
This node graph is responsible for blending the limb between the pre-set limbs but the new addition to this means the blend in the same area whereas before it just added the two together.
Adding them together did blend but it resulted in the final limb being twice as large.
Form left to right:
The group node to the far left is connected to the GUI, so as the user slides the slider it changes the attributes of this group (0 to 1)
The output of the sliders is input into the blend colour nodes, so if the human slider is set to 1, the human blend colour node blender is 1, which takes the true value (which is the human pre-set).
Then the sum of all these blend colour nodes is fed into an average node which adds them all up.
Then the top average node connected to the start group adds up all the blend values.
This means the 1st multiply divide node takes the output from the pre-sets and divides it but the total sliders, meaning that if 2 sliders are set the the max, the limb is twice as large as before, but now it gets divided by the sum of the sliders, so its reduced back to its normal size.
This means that when you slide up several sliders at the same time the output limb is a mix of them but not the sum, so it all blends in the same area.
The last Multiply divide node multiples the final result by 2, this is because the average node at the top has an added value of 1, this added 1 is to avoid multiplying by zero if all the sliders are set to 0. By adding the 1 and later multiplying by 2, the same result is made but without getting a zero if all sliders are off which causes errors for dividing by 0.
HR - WIP - 027
Via Flickr:
Just going back through the script and fine tuning and fixing a few areas that have been left.
Now its possible to choose if you want the left, right or both but also mirror your movement from left to right or right to left.
This makes it easy to create symmetrical character or the user can even mirror the movement to get a good approximation, then disconnect the mirror to make them slightly different.
HR - WIP - 026
Via Flickr:
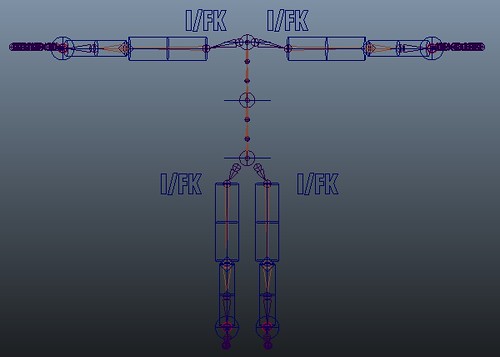
Now its able to add IK, FK and convert those to stretchy IK and FK.
This was quite hard to set up as im trying to make it as flexible/fool proof as possible, this way the user it able to create IK or FK in any order or even add them after the character has been skinned or even animated.
Tuesday, 31 July 2012
HR - WIP - 025
Via Flickr:
:D
This is where the hard work is starting to pay off.
With absolutely no change apart from using "Leg" as the procedures argument instead of "Arm" the whole process of adding IK, FK, Pole vectors, Stretchy limbs and control curves is completely compatible with all "Leg" limbs.
And By "Arm" and "Leg" this is referring to all upper and lower body limbs be that birds wings, flippers horse legs.
For parts like the spine and head the bones are different so they will need there own custom procedure's but those custom procedures will be very small as that will just be using the same procedures that the arm and legs do to convert to joints, set-up the GUI and do all the IK/FK stretch and controls.
making this all procedural and flexible to work with any limb has really saved a huge amount of time as basically one process can be applied to all limbs.
HR - WIP - 024

Via Flickr:
Top down view of procedural controls.
At the moment im just setting up the procedures to create the stretch, IK and FK but also the procedures to create the controls.
I'm making the controls in there own procedures so the script becomes more fixable, this means I can call the CCTubeControl to make a tube control at any part of the script and use it for anything in that area be that arms, legs or other parts of the rig.
For the FK arms (Tubes) there actually inside a Group that's been rotated to fit the joints, this means that I can have a nice clean 0, 0, 0, in the rotation of the controls but still have the rotation axis in line with the bones.
The next step now is to set-up the IK/FK switch. This is sometimes done by having 3 arms, IK arm, FK arm and another arm that blends between the two.
However for this im quite confident everything is working fine so im going to just set up different constraints and when you blend form IK to FK different constraints blend off or on.
HR - WIP - 023
Via Flickr:
This is the node graph procedurally generated when applying the stretch to a limb.
Moving from left to right, basically its a distance tool connected to the start and end of the limb,
This tool outputs the length of the arm,
The condition node then compares the distance to a "Stretch start" value (will mention later)
If its larger it will switch the outputs to true (which is is the distance/by "Stretch start" value)
The "stretch start" value is the length of the arm when its fully locked, this means the condition node compares the current length of the arm to the length when its fully locked,
If the distance tool have a value larger than the length of a fully locked arm this is where the stretchy switches on,
So basically the stretch starts when the arm is fully extended.
The final output is linked to the scale X of the joints which just stretches the joint chain.
The multiply/divide nodes basically make sure its a smooth transition,
this means as the arm gets fully locked, the dimension tool and "Stretch start" value are equal,
so dividing these two results in 1,
as it increases its basically stretching the limb in proportion to the "Stretch start" value
Without this the limb would jump a large amount as it would stretch and add the length of the arm as well.
The top left multiply/divide node holds the "stretch start" value,
This will later hook up to the Global controls scale,
This means as the whole rig is scales up, so is the "stretch start" value as the length of the locked arm will be larger due to the arm being scaled up as-well.
Thursday, 26 July 2012
Rigging form
Hi, I would relay appreciate it if you could fill out this form on your rigging experience, even if you have little or no rigging experience :).
https://dl.dropbox.com/u/30666061/Masters_project_public/Rigging_form_01.docx
Thursday, 19 July 2012
HR - WIP - 019
Via Flickr:
Added even more functionality to the GUI allowing you to create as many limbs and also delete them if you don't want them.
Here are 4 pairs of different limbs made in under 60 seconds.
Next step is to add the procedures to make the controls and things like stretchy IK and add in the IK/FK blend if the user requires it.
once there added its just a case of the user clicking what they need and should be able to make several limbs fully rigged and fully customizable in minuets :D
Wednesday, 18 July 2012
HR - WIP - 018
Via Flickr:
This is the result of the previous image (GUI window).
Here 3 sets of limbs have been made, each with there own names and using the drop down menu at the top of the GUI you can edit each on there own at any time (well any time before there converted to joints).
HR - WIP - 017
Via Flickr:
Quite a large update that has added a great new feature :D
Now as a user chooses a name and generates the limb, it creates its own script node which it links to.
This also adds the name to a drop down list at the top, this list is above the tabs so it can be used in all tabs. As the user makes multiple limbs, they all get added to the drop down list.
Then if the user selects a different limb in the list it runs a procedure that disconnects the window from all limbs, then attaches to the new selected limb.
The basic idea is, you make as many limbs as you want, then whatever you do in the tabs below (moving sliders and buttons) will be applied to the limb that is selected at the top.
This means you can edit as many limbs on the fly and go back and edit them later even if you have made more limbs since the 1st was created.
Also, the best thing about this is that no global procedures or variables are used and no information is needed to be send out of maya. Also you can save you work, close maya, re-open it and all the values, limb names and attributes are stored which is a section missed by most rigging scripts as they require you to start and finish before closing maya.
HR - WIP - 016
Via Flickr:
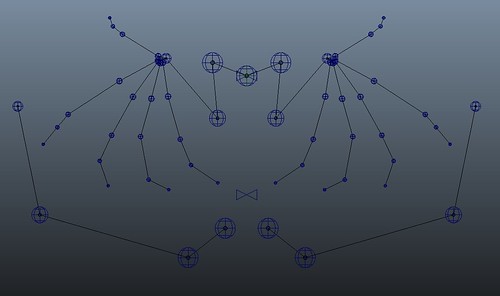
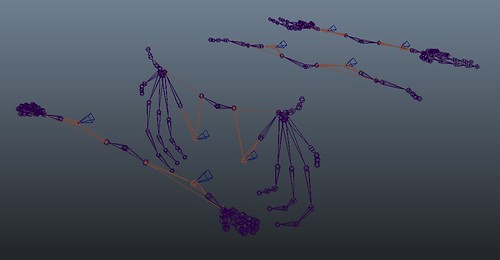
I hear you like limbs, so we put limbs on your limbs :D
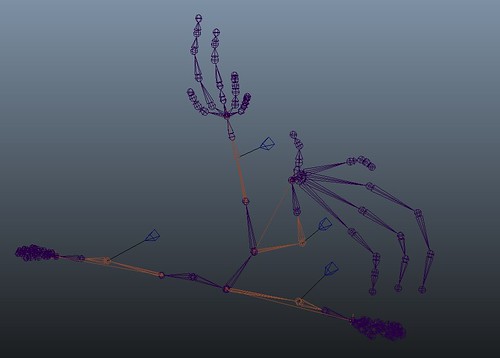
Added the dolphin limb and just messing around to see how it copes in strange situations.
Here is a human arm with a bats wing and dolphin arm all joined up just to test how it will work.
HR - WIP - 015
Via Flickr:
Just adding some more pre-set sliders,
This is the horse legs, to make it blend better though all limbs are in the t-pose so there will be an added section to scale/rotate the limb as a whole
Thursday, 12 July 2012
Thursday, 5 July 2012
HR - WIP - 014

Via Flickr:
Errors or unexpected things can be good sometimes :P.
I've started on the procedure to converts the spheres the user positions into joints.
For bug checking im trying to do things that your not supposed to, like going back to the first tab of the limb generator and generating new limbs after you have already generated some but this has given a new idea.
If you do go back and generate a new limb it will work and follows the same rules so this could be used to makes a character with lots of the same limbs (like a centipede's legs)
Another useful bug is that when the limb is converted into joints, to make it fast i just run the procedure on the left, then run the same procedure but change the prefix to L, so with this, i might split the left and right up again as the user could click to convert the left but then still edit the right before the convert it. This way if a user wants one limb human and another a wing the can work on them at the same time but still have them different.
Monday, 2 July 2012
HR - WIP - 013
Via Flickr:
WOOOOO,
Its been a while since the last masters project update and there doesn't look to be much change but under the hood in the code quite a lot has.
The main update since the last is now it has a mirror function, custom name prefix and attachment object.
So now the user chooses a connection object in the list, types a prefix and the limbs are generated and mirrored.
The mirror options are non (no mirroring) symmetrical (which links the right to the left so changing the left will update the right) and asymmetrical (mirrors the limb type but user can move the other limb freely.
Main updates under the hood is mainly making a phalanx (finger) procedure so the fingers are all made in the same block of code, later this will be expanded so every bone is made from this finger procedure.
It seems like not much is happening at the moment but by spending extra time fine tuning means later on I can practically copy this section for the next limbs so in the long run it will be saving some time.
Friday, 29 June 2012
Eye Doctor in the finals!!!
Please follow the link for the 4 finals and vote for your favourite :D
http://www.optometry.co.uk/awards/best-educational-video-2012
Tuesday, 22 May 2012
Website in the making
http://www.jamesdt.co.uk/
Tuesday, 8 May 2012
Visual Electrodiagnostic Testing Animation
Working in an amazing group of talented people :)
This is a group project with me and some Bradford Uni graduates have been working on as part of the digital media working academy. Working with some really talented and great people David Williams, Arran Hughes, Pauls Kalnenieks, Ravi Kamble Govind & Jason Theaker.
Thursday, 26 April 2012
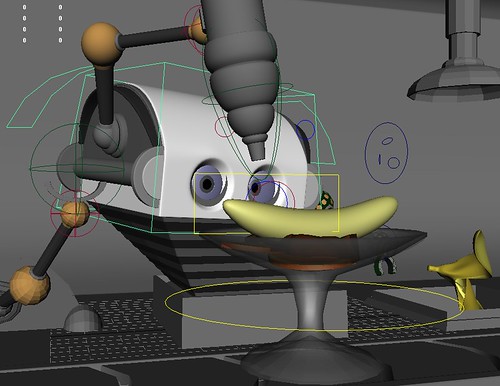
1C3 - BOT
1C3 - BOT, originally uploaded by James D Thompson.
Via Flickr:
Final render used in the presentation but might have some changes for final submission.
Had fun with this as ive not use nparticles before and only ncloth a little so there was a lot to learn.
Decided instead of doing a few boring examples of dynamics it would be better to add some character animation. This helped as this is the industry im aiming for and having the character affect the dynamics presented its own challenges that I have to test and overcome.
The overall shadring/render isn't great so that could possibly be improved as well as the animation but overall im happy with the final result.
Music: The real tuesday weld - clerkenwell kid
Monday, 23 April 2012
Ice - WIP - 0013
Via Flickr:
"Just a little dab here"
Finishing off the animation and adding some more N-particles.
Ice - WIP - 0012
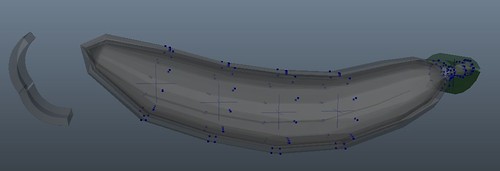
Via Flickr:
Here is decided to have the robot slice the banana skin with a beam in 3 splits. This means i want the skin to start falling over around 100 frames from left to right.
However the N-cloth all falls at once so to fix this i created come transform constrains that switch off in sequence from left to right so now the banana starts to split, making it look like its opening as the beam passes through.
Thursday, 12 April 2012
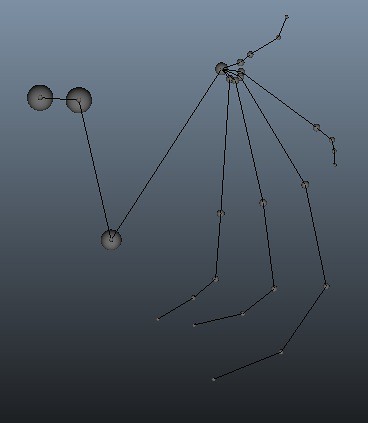
Blend test 2
Blend test 2, originally uploaded by James D Thompson.
Via Flickr:
Same as last video but with the double offset fixed. All made through Mel procedures hooked to the GUI so its easy to use for non-riggers :).
Blend Test
Blend Test, originally uploaded by James D Thompson.
Via Flickr:
Feeling all excited as this is the first glimpse of how it might look when everything s all working together after just writing blocks of code for the past few days.
This shows the slider in action, blending from a human arm to the bat arm, as you can see the user can have either, or a blend of both. The sliders are also key-able which doesn't mean much but I can use that later when creating a demo of the script.
At the moment the bat arm is twice the size as the human, this is because (for debugging purposes) i've made the human arm the default arm when everything is made, so when blending its actually a bat + the human arm so everything is doubled but now i know things are working the default will be 0, 0, 0, for all the controls, then the user can slide the human slider up to make the human arm or make the bat wing and it wont double up as it starts from the default 0, 0, 0.
HR - WIP - 012
Via Flickr:
Making a bat wing out of an arm.
Now that the whole thing it working, now I just need to input the translate values of the different limbs. To do this im going to just use the limb maker ive already got as a template, move the spheres and just note down the values.
Once its done ill store the values in a matrix in mel and assign the values to the blend col nodes, so when sliding the sliders the blend col nodse blend from 0, 0, 0, to what ever value i find here.
Wednesday, 11 April 2012
HR - WIP - 011
Via Flickr:
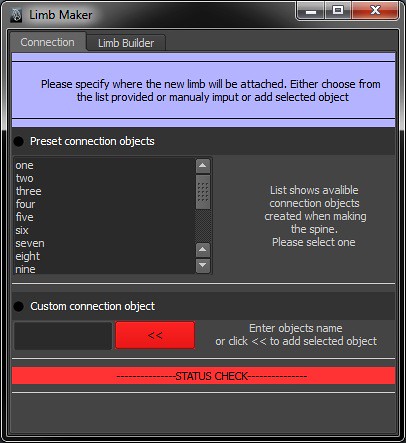
Just the first 2 tabs at the moment with a few functions working.
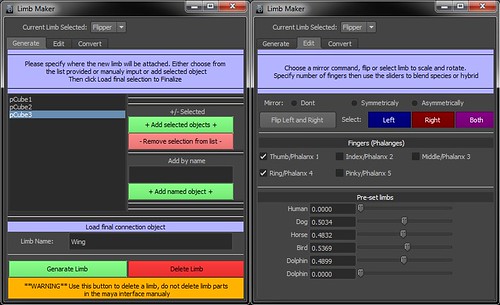
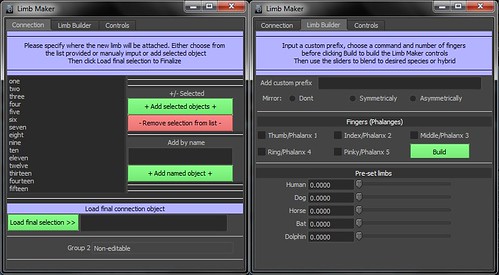
First tab shows a list of connection objects and some buttons to add selected objects (if the user want a custom connection object) or a text field to enter the name of a connection object if the object is hidden or hard to select.
Then a finalise section (still wip) which adds the final selection in the list to a string in mel which will be used for the limb builder to find the connection object e.g. if the connection was spine_clav, the limb maker will find the position of the "spine_clav" and connect the new limb to it.
The second tab ------------------------
This tab ask's the user to type a prefix (That will be added to the names of the limb). Then select a mirror function, then how many finger/phalanges.
When the build button is pressed it will take all the information in the GUI and pass it to the limb maker procedure shown in previous WIP's.
Also after the build the limb will be hooked up to the sliders, so now changing the sliders will make that limb, this also works in real time so as sliding the actual limb will update at the same time.
Monday, 9 April 2012
HR - WIP - 010
Via Flickr:
Having fun getting the window ready.
How it works------------------------------------------------------------
I started making a window a few months ago but found it relay hard as I was still re-familiarising myself with the Mel syntax and windows are one thing that are quite awkward to get working.
To start off with all window i make have an if statement that sees if the window is already there and if so delete it. This is because if the window is already there the new window will have trouble opening, also windows can be open but hidden so just having this if statement forces it to delete even if hidden, then re-open.
To start off with i made the window with all its elements but decided i wanted tabs across the top. So the idea is you complete the tasks in each tab then move to the next, this avoids having a huge window or after each step opening a new window.
To get the tabs working was annoying at first but the best way to get it working is using a string as the child for a tab, having that string contain a columLayout command, running a procedure after the string, then a set parent to attach the procedure to the columnLayout. The procedure that was run and attached is actually just a procedure that contains that tabs elements, so all the text buttons and any other columLayout commands.
So basically its like making a window in a procedure ant attaching it to a string that is in the tab, then for the second tab ill just create another procedure with all that tabs elements in it.
What's it for?-----------------------------------------------------------------
This window is the main limb maker, so the 1st tab ask the user to select where the limb will attach, so if its a arm you would want it on the scapula and legs on the pelvis but for some creatures they may have 6+ limbs or even some strange creature that has arms for legs. So this is basically asking the user to either specify a part of the spine that ive set as a connect area (for most characters) or specify there own object for more custom/advanced riggers that have a special case where they need to define there own (or even if they didn't make the spine earlier or have made there own).
The next tab after selecting the connection object will run the limb procedure, attach to where the user specified and contain the sliders for pre-set limbs.
Then other tabs may include setting up IK/FK and custom/procedural control curves.
Sunday, 8 April 2012
HR - WIP - 009
Via Flickr:
Really liking the power of mel.
When I first started with mel I kinda went into it with a bad attitude as "eww its programming, ill just do it to get it out of the way".
The main reason for doing it as its an essential skill for any rigger but now im approaching it in a rigging way (a way i like) its starting to make more sense and the results are quite fun :).
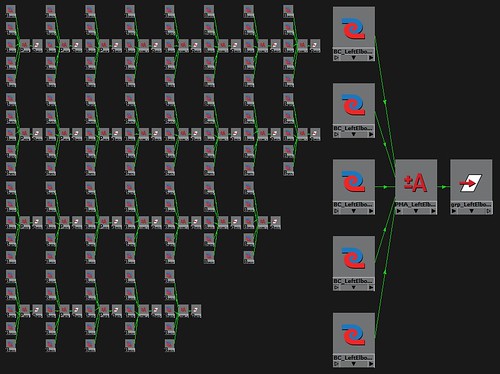
Here ive made a procedure so for every sphere control i make, it also calls on a "blendConnect" procedure which basically makes a +/- Average node, hooks up 5 colour blend nodes then hooks the average out 3D to the spheres controls group.
This means the user moves the sphere in the view-port, then the average node moves its group (which in-turn also moves the child sphere control). The blend colour nodes have true which will contain the values of the pre-set (x, y, z translate where the sphere control should be) and a false (0, 0, 0) which means no movement.
The blend attribute will later be hooked up to the GUI, so as the user slides the slider, the whole arm will blend. Also the user can blend a few sliders (e.g. 0.5 human, 0.7 horse) then they can tweak the sphere controls manually to fit there mesh.
Saturday, 7 April 2012
HR - WIP - 008
Via Flickr:
Now the process is working for one curve i can just apple the same to the rest.
So here we have the full arm with the spheres to move and curves just to show the user where the joints will be going.
Now im going to connect this up to the GUI with the pre-set sliders and apply the same method to the legs.
HR - WIP - 007
Via Flickr:
Might not look like much, well it isnt :D, but making it through mel was.
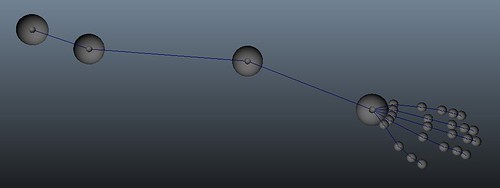
Here are some sphere controls made through a procedure and some curves that get each cv clusters through another procedure.
What they are it a representation of where the arm will be made, so the user has the ability to choose a pre-set in the GUI, then manually move the spheres to fit there character mesh.
Then when the user is happy with the arm, the will click apply/covert to joints and the curves get fed into a procedure that places joints on a curve, then parent them.
Now ill input the curves for the fingers.
Quite liking this method of making joints and might attempt to make a joint tool later on using this method. as drawing joints this way you can move the spheres how you want and then create a clean joint chain, instead of moving/rotation joints and then fixing the orientation later.
Saturday, 31 March 2012
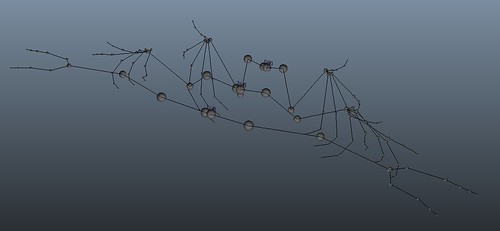
HR - 006 - WIP

Via Flickr:
Here iv been working on the ribs a bit more. Getting reference for horse skeletons is harder that the human counterpart, there are plenty from the front and side but not many from a perspective view that show the full volume of the ribs.
After some searching though I came across a few that were relay helpful.
For the ribs again i deleted all but the 1st, re-moulded the 1st and duplicated and re-moulded for the rest.
The main reason for not just using the same ribs from the human is id have to remoulded each rib separately so having a clean new one made it easier and quicker.
Also to note is that horses have more ribs than humans.
Now ill got ahead and remoulded the sternum and cartilage between the ribs
HR - 005 - WIP
Via Flickr:
Fine tuning the spine, here I deleted most of the middle spine, changed the front one and used that for the rest as the middle ones are quite similar.
Monday, 19 March 2012
Masters - WIP
Currently iv been starting my main masters project which is going to be homology based rigging script. The idea is that through homology (the study that animals share structures e.g. bones) we can apply the same rigging methods to similar structures, e.g. a dog and human arm are similar in bone structure so the rigging can be similar as well.
So with this ill be making a rigging script that the user can blend between different creatures and pre-sets. The idea so far is that the user selects what spine they want, then limbs, what animal/hybrid they want for that limb, then any fine tweaks they want from the limb to fit there character.
Friday, 24 February 2012
Charity run
Sunday, 8 January 2012
Light-Dance motion capture
Light-Dance motion capture, originally uploaded by James D Thompson.
Hi, this is part of my motion capture project for Bradford university. everything was made by me except the skull (which is a model i have the license for).
The motion capture was performed by Cernamoret Paul Andreiand recorded at Bradford university and cleaned and edited by me with Vicon Blade, motion builder and Maya.
The two dances were captured separately then joined in maya.
The set works in real-time and moves according to an audio input and the circles below the skeleton move to movements of the character, the idea is that if you were streaming real-time motion capture you could have the set reacting to the dancers moves and music/vocals through a mic.
Music:
Jordin Sparks, Chris Brown - No Air ft. Chris Brown
TC - Wheres My Money (Caspa Remix)
Wednesday, 4 January 2012
Dance in Maya
Dance in Maya, originally uploaded by James D Thompson.
Just applying the mo-cap data from motion builder to my character, after this ill export as an animation clip to be used with other clips :)