Decided to slow down a bit before I start animating as that was my main downfall in previous projects.
Ham Luske said "Your animation is only as good as your poses. You can have good timing, good overlapping action, good follow through but if your poses are not strong and to the point (telling the story) you do not have a good animation."
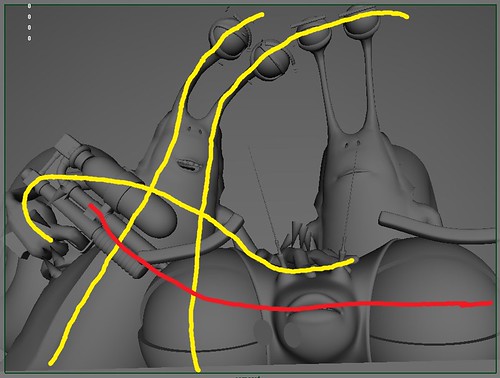
So ive started to think more about the key poses and the story there to convey. In this image ive started to do the key starting pose for Tony (left). To try and link him in with the other characters im trying to concentrate on the line of action. making his arms flow into the main areas of interest and using his antennas to lead you eye to the character Avi (right).
The lines indicate pulling the scene in, Tony flowing from left to right, then Avi right to left (Avi hasn't been done yet) creating a claustrophobic scene for the dragonfly's line of action constrained between the other two.
Friday, 26 November 2010
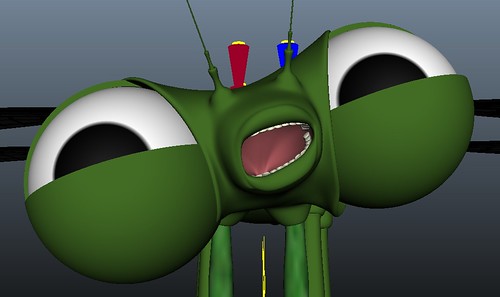
Facial animation - WIP - 02
Thursday, 25 November 2010
starting animation
starting animation, originally uploaded by James D Thompson.
Just started doing the animation, for this i decided to block out the whole scene for the "Avi" character using a pose to pose approach, then build-upon the in-betweens with a straight ahead approach.
The last two actions need to be a bit sooner and snappier but this is working as a 2nd pass. after this ill start on the facial animation and do a final pass at the end to make it nice and shiny :D. ive decided to do the facial animation in the middle as ill need the general position of the character to make the best facial pose for that angle but I also want to get the facial animation started early so its not all left to the last phase.
Facial animation - WIP - 01

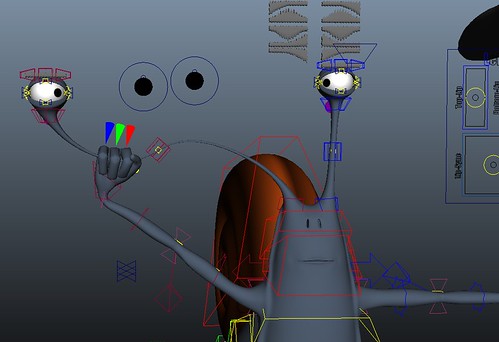
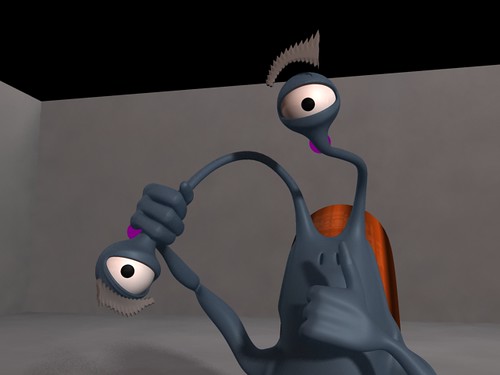
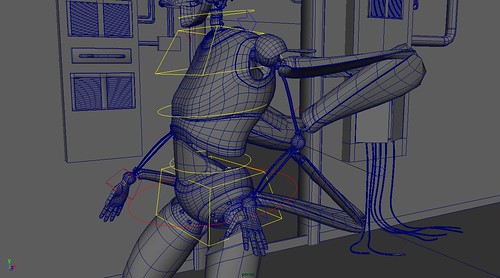
Started to bring that characters together using Maya references.
Using references I'm still able to edit the entire character whilst animating, it work by loading in the characters from there own .ma file, so the scene I will be animating in only contains the animation data.
So far im just setting a few poses, the shading is off as ive not made any environment or lights yet, also I might drop the cell shaded look depending on how it goes.
Barry - WIP - 18
Been ill for a few days so not got much work done :S
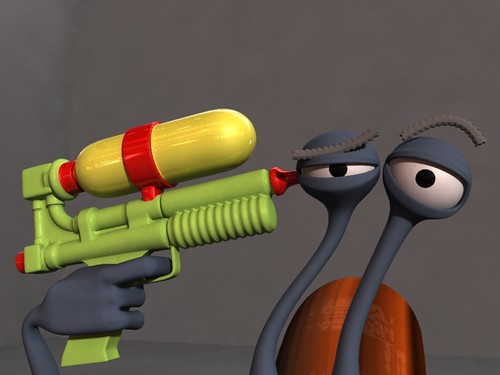
decided to start on gun but instead of making it real I decided to make it more comical by using a water pistol :D
The gun itself is just a few simple polygon meshed all using the same shader that has a round corners bump node, which helps blend the hard edges where tow polygon objects meet. So overall it sort of looks like its all one piece of plastic.
Barry - WIP - 16
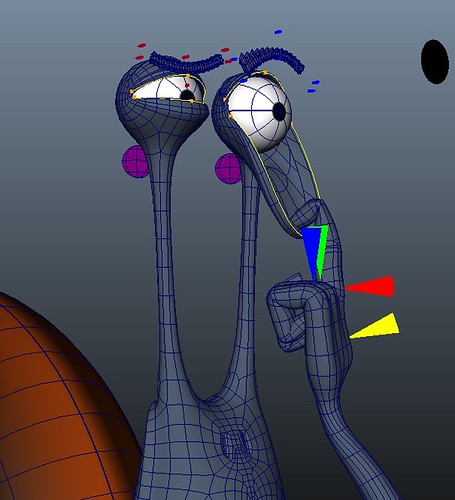
Decided to add the same blend parent node based rigging i used for the dragonfly's tail, so his antennas can be set to follow other objects e.g. he can grab it then the eye will follow the hand.
I also decided to scrap the joint based facial rig as it looked like it will take too much time. I might apply if after when ive done the blend-shapes for the mouth so both can be used :)
Tuesday, 16 November 2010
Barry - WIP - 14
Decided to make him even more over the top cartoon style with stretchy eye lids.
For most part of the rig its entirely joint based for the deformations, then some blend-shapes added on top for the finished result.
For the eye lids though its entirely joint based as to get this same result with blend-shapes would take a lot of time and several blend-shapes.
There was virtually no paint weights needed as a default smooth did did a great job, the only area that needed fixing was the back of the eyes, so i created a chain of joints to hold the back in place as the lids stretch.
The main reason im making him so stretchy is because im planning to make a few more shorts with him :D
Monday, 15 November 2010
Save UK animation
Absolutely discussing, the fact that animation is such a huge and profitable industry means that if UK animation was funded it would put more money back into the economy than it takes out. Just another indication that the labour party are a bunch of short term money garbing idiots that have no idea how to run a country.
Barry - WIP - 12
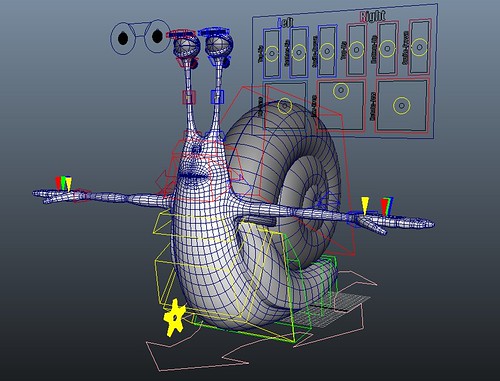
This is a shot of the complete snail rig minus the facial rig. All thats left is to start the snails blend shapes and connect it up to its GUI.
I decided to do the snail after the dragon fly as there are 2 snails and they have most of the dialogue, so learning for mistakes i made and over came from the dragonfly's face ill be able to make this one better and faster :D
Barry - WIP - 11
Just a test render to see if the rig isn't affecting any shading.
One important thing ive learned is signing off a job before the next, so im 100% sure the rigging is complete before i animate. otherwise i might get half way through animating when something crops up and ruins it.
Ive rigged the whole thing and set up the UV's so later on i can create the textures without ruining any of the rigs skinning.
Tuesday, 9 November 2010
D-Fly - WIP - 18
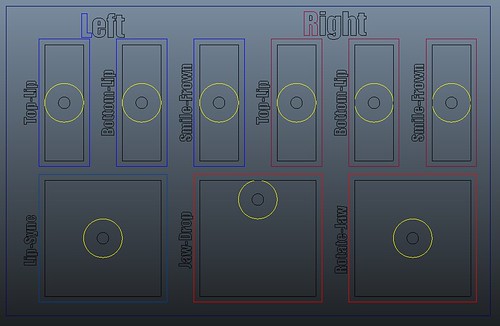
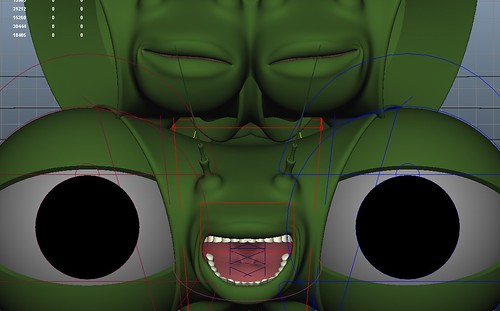
Decided to layout the facial rig like many other rigs ive used before as its very easy to work with and animate :D.
Ive split my blend-shapes into left and right so im able to manipulate them individually. then combined some blend-shapes and jaw rotation into the Lip-sync control.
The lip sync controls works by: Top left = wide + closed, top right = narrow + closed, bottom left = wide + open, bottom right = narrow + open.
On top of all this i might add some small controls on the face that are attached to joints to I can add some more offset in the animation to make it look different :)
This grid like layout is also discussed in the book "stop staring" with scripts to make it but i didn't use them for this as i wanted to make it all myself from scratch for practice :D
Monday, 8 November 2010
D-Fly - WIP - 17
Perverted dragon fly :D
Adding more blend-shapes and splitting them into there left and right parts. so far things are ok sol ill start to move onto more complicated shapes.
D-Fly - WIP - 16
Here I have used the script SS2 taper (as described in the book "Stop staring")
I made a smile blend-shape that had both sides smiling, then I used the "paint blend shapes weight" tool to paint out one half of the smile. then using the SS2 taper script it split what I had painted into 2 shapes (1 shape what I painted and another with an opposite paint). this gave me a left and right smile as different shapes, then when combined they give a full smile, this way I'm using 2 shapes instead of having to make one for each side manually and trying to get the the same by hand.
D-Fly - WIP - 15
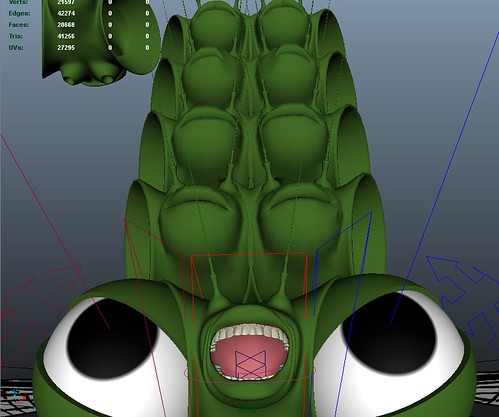
Surprised face... made the jaw bone and painted the weights for it before I make the blend-shapes, this way when testing the blend-shapes I can see if they also work with an open mouth :D.
I made 3 jaw bones wit an offset so when I rotate the jaw control, the 1st joint moves 100%, the 2n 60%and the 3rd 30%, this way the chin creases and compacts nicely :), also it makes paint weights easier for better deformations.
D-Fly - WIP - 14
Decided to try out adding some subtle toon shading. I like the way it looks with some textures and mental ray shaders so I didn't want to make it 100 matt toon shaded so its a blend between the two.
What am i - WIP - 42
Mr muscle :D. the reason this is happening is that Maya’s c-muscle are dynamic, so the react to higher velocity by jiggling more. So… if you use a stepped tangent or instantly re-pose a character in the next frame, the muscles see this as a huge change in velocity as they have essentially moved a huge distance in 1 frame, so they jiggle to the max. To solve this each time I make a sudden pose change I start the animation in a new scene file referencing the same room and character, this way they animation curves start again from frame 1 in the new scene and the muscles can keep cool :D.
Also the muscles in this show are from my animatic which doesn’t have the muscles setup to how they should be so the jiggle values are too high as well.